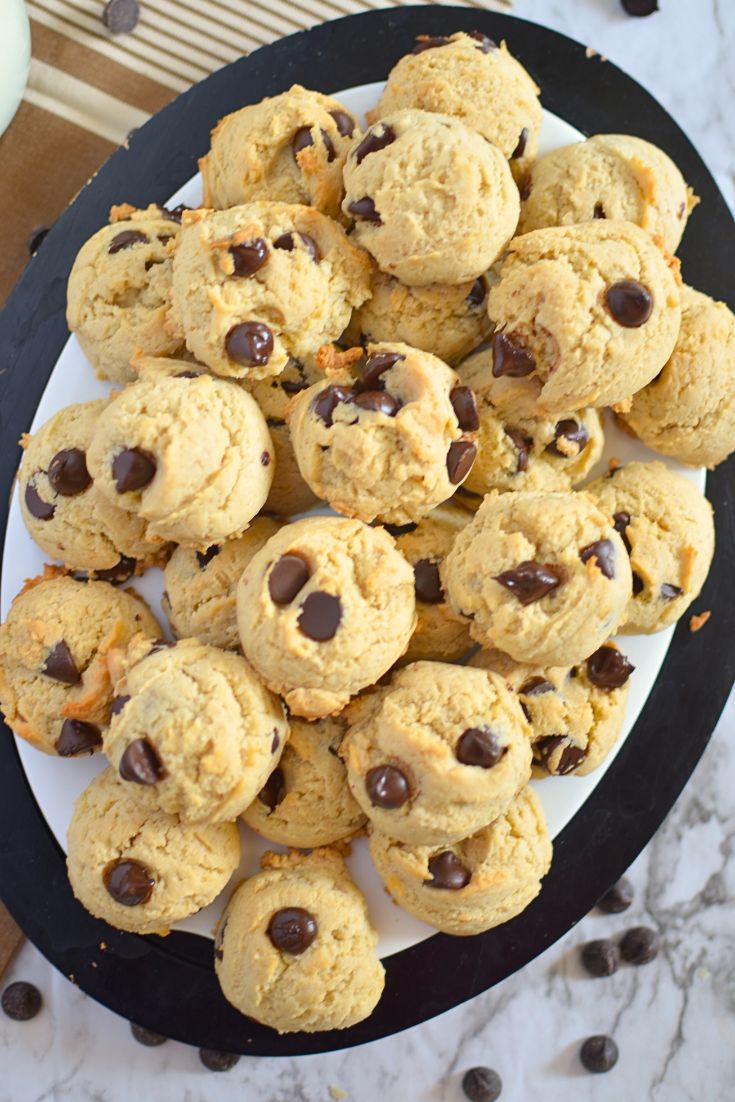
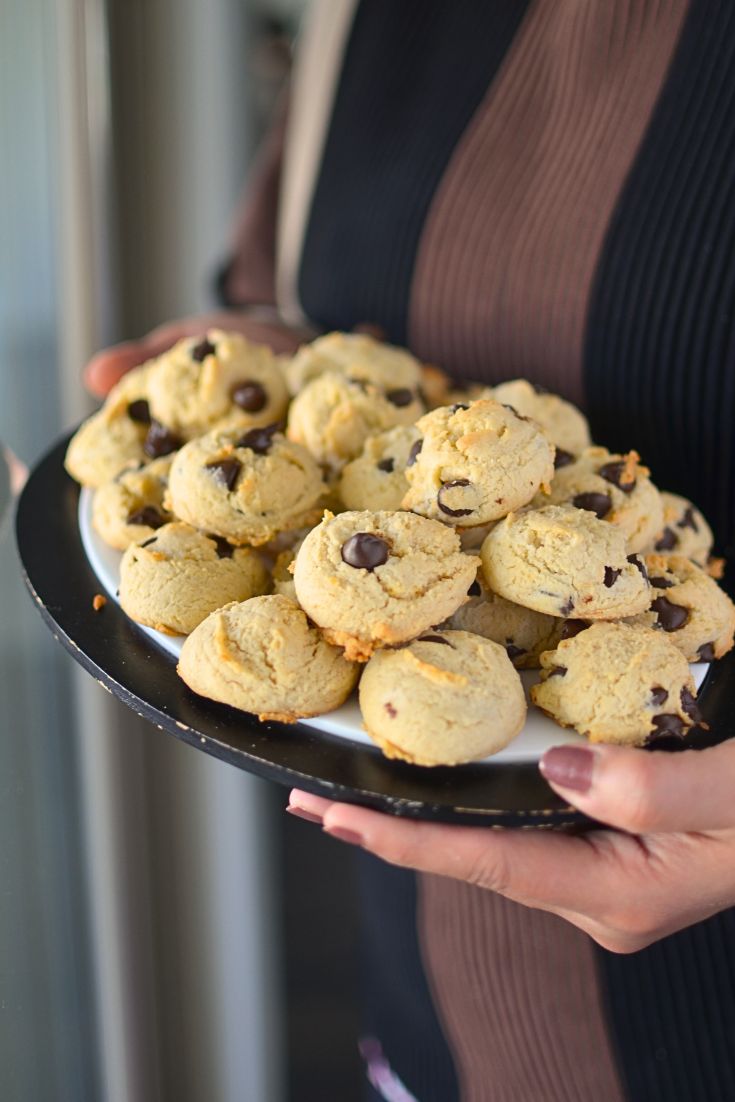
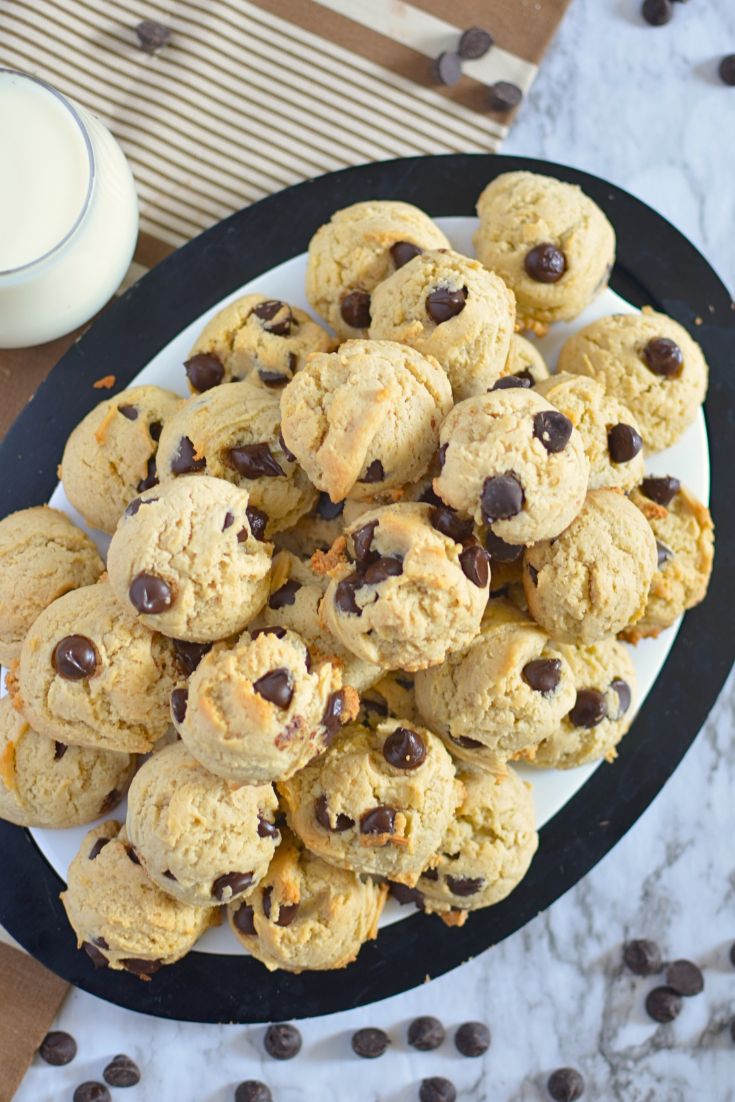
Go ahead and indulge in the irresistible blend of creamy cheesecake and classic chocolate chip cookies with these delectable Cream Cheese Chocolate Chip Cookies .
At The Belly Rules the Mind, we believe we need to sometimes give in to our desires of eating something soft, sweet and chewy. My kids love cookies, and I am always looking at options to make them at home vs buying the store-bought ones.
These No-Egg cookies are perfect for those who can’t choose between their love for the rich tanginess of cream cheese and the timeless allure of chocolate chips. The simple addition of the star ingredient, cream cheese, elevates the classic chocolate chip cookie into an exquisite treat that promises to become a new favorite in your baking repertoire.
Come JOIN US on Instagram @thebellyrulesthemind.official and Pinterest @Bellyrulesdmind and be a part of our community and discuss various recipes, tips and tricks.

Ingredients That Make a Difference
Now, we all know that every cookie recipe has its stars and supporting cast of ingredients. So, what makes these Cream Cheese Chocolate Chip Delights so special? Here’s a sneak peek at the lineup:
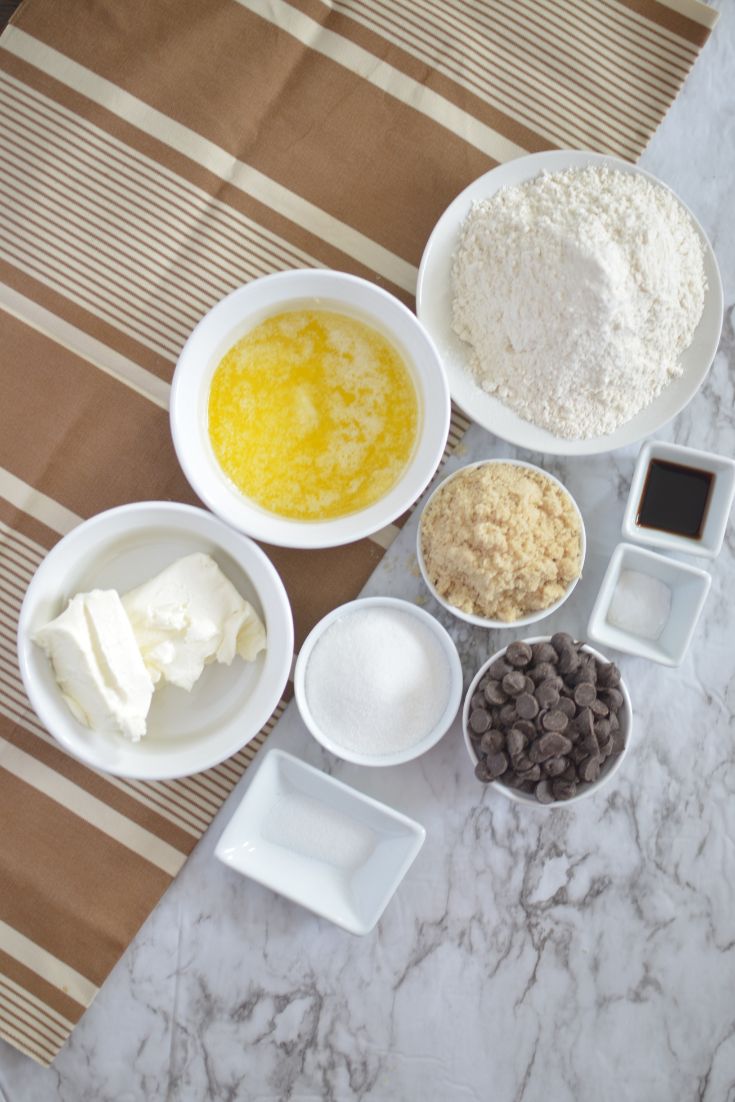
Ingredients:
- Unsalted butter: Provides a rich, creamy base.
- Cream cheese: The game-changer for that oh-so-tender texture!
- Granulated and light brown sugar: A sweet duo that adds depth and moisture.
- Vanilla extract: A dash of this aromatic essence brings warmth and flavor.
- All-purpose flour: The foundation that holds all the goodness together.
- Baking soda: Our little leavening agent that ensure a perfect puff.
- Salt: Just a pinch to balance sweetness and enhance the overall taste.
- Chocolate chips: Because what’s a chocolate chip cookie without them!
Pro Tip: Always opt for quality ingredients where you can-the better the chocolate, the more irresistible your cookies will be!
Step-by-Step Guide to Cookie Perfection
Roll up your sleeves and get ready for some baking fun! Here’s your step-by-step guide to creating the most delightful Cream Cheese Chocolate Chip Cookies that will have everyone asking for seconds.
- Preheat your oven to 350°F (175°C) and line a baking sheet with parchment paper.
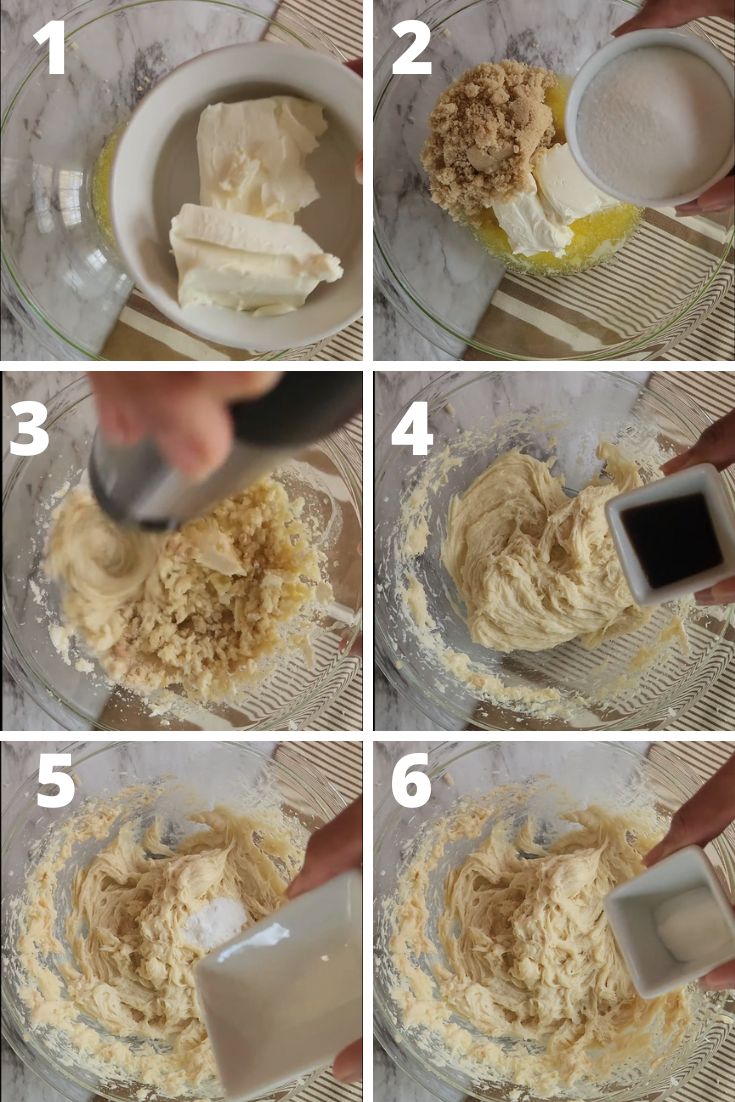
- In a large mixing bowl, cream together the softened butter and cream cheese until smooth and fluffy.
- Add both granulated and brown sugars to the mix, beating until well incorporated.
- Add the vanilla extract, ensuring everything is well combined.
- In a separate bowl, whisk together the flour, baking soda, and salt.

- Gradually add the dry ingredients to the wet mixture, stirring just enough to blend without overmixing.
- Fold in the chocolate chips, distributing them evenly throughout the dough.
- Scoop the dough onto your prepared baking sheet using a cookie scoop or tablespoons, leaving space for them to spread.
- Bake in the preheated oven for about 13-15 minutes or until the edges are golden and the centers are set.
- Let the cookies rest on the baking sheet for 10-15 minutes before transferring them to a wire rack to cool completely.
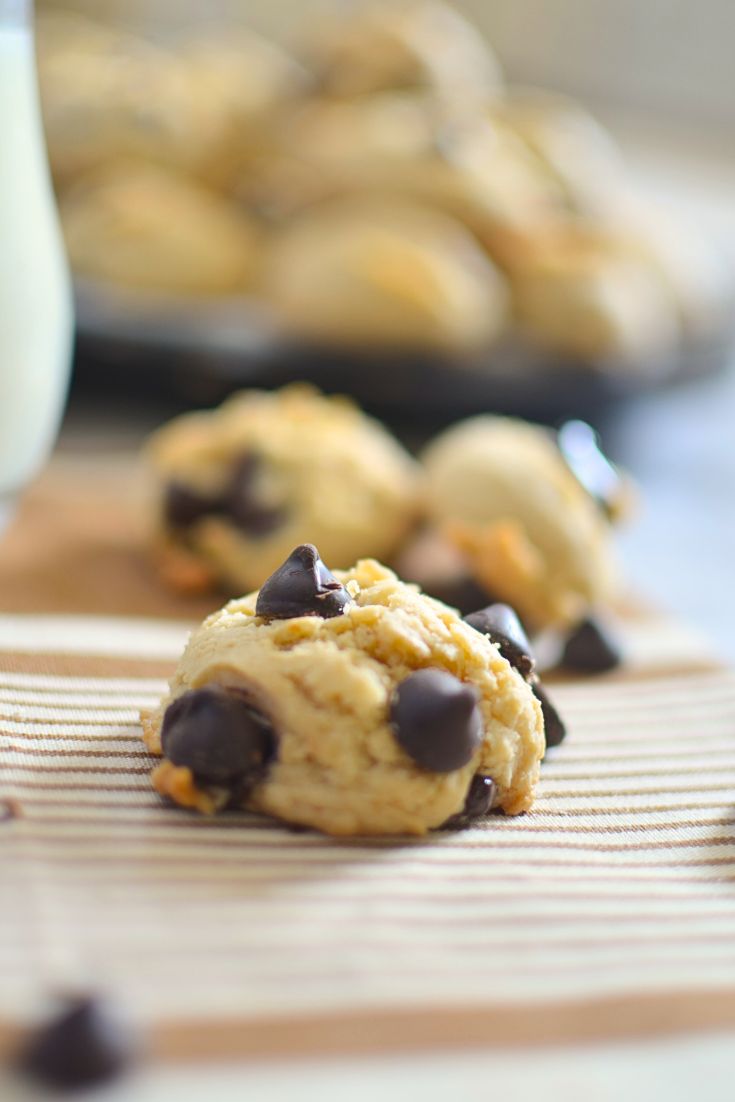
Now, take a moment to admire your work-a tray of gooey, chewy chocolate chip cookies with a tangy twist!
Tips for Achieving the Ultimate Cookie Texture
Why Cream Cheese Is Your Baking Game-Changer
If you’re yearning to make cookies that truly stand out, it’s time to embrace cream cheese as your secret weapon. Here’s why:
- Texture Revolution : Cream cheese ensures your cookies are thick and chewy, setting them apart from the flatter, crisper alternatives.
- Velvety Richness : The slight tang of cream cheese balances out the sweetness, adding a sophisticated depth of flavor.
Cream cheese can single-handedly elevate the humble cookie to a confectionery masterpiece. They don’t just melt in your mouth; they leave a lingering richness that elevates every bite.
The Do’s and Don’ts of Cookie Dough Consistency
Creating the perfect cookie dough consistency is an art. Master it with these essential do’s and don’ts, and you’re on your way to cookie nirvana.
Do’s:
- Do use room temperature ingredients : They combine more uniformly, resulting in a smoother dough.
- Do chill your dough : This prevents cookies from spreading too much and enhances flavor.
- Do measure precisely : Baking is a science, so accurate measurements are key to consistency.
Don’ts:
- Don’t over-mix : Once the flour is in, mix just until combined to avoid tough cookies.
- Don’t over-soften your butter : It should give slightly under pressure but still hold its shape.
- Don’t rush the chilling process : If the recipe calls for an hour, give it an hour-or even better, overnight.
Remember, patience and attention to these details will reward you with the softest, chewiest cookies on the block!
Variations that Will Excite Your Taste Buds
Mix-In Magic: From Nuts to Oatmeal
Are you ready to take these Cream Cheese Chocolate Chip Cookies to the next level? Let’s talk about mix-ins that add texture, flavor, and a personal touch to your creation.
Mix-In Ideas:
- Chopped nuts like walnuts or pecans for a satisfying crunch.
- Oatmeal for a hearty, chewy twist that adds a fiber boost.
- Swirls of caramel or dollops of peanut butter for a gooey surprise.
- White chocolate chips or toffee bits for those with a sweet tooth.
- A handful of dried fruits like cranberries for a chewy, tangy kick.
Go ahead, get creative and customize! Whether you prefer the nutty depth, the hearty chew, or the velvety melt, there’s a mix-in for every palette.
Decoding Chocolate Choices: Chips vs. Chunks
The age-old debate among cookie enthusiasts: to use chocolate chips or chunks? Let’s decode this delicious dilemma:
Chips :
- Uniformity : They offer consistent pockets of chocolate throughout your cookies.
- Melt Factor : Chips are designed to hold their shape, giving you that classic cookie look.
Chunks :
- Rustic Appeal : Chunks provide an artisanal touch with uneven bits of chocolate.
- Melted Bliss : Expect gooey rivers of chocolate with each bite from the varied sizes.
Whether it’s chips for nostalgic charm or chunks for a luxurious melt, the choice shapes your cookie experience. Experimenting with both can lead to your ultimate chocolate chip cookie revelation.
Keeping Your Cookies Fresh and Flavorful
Best Practices for Storing Your Homemade Delights
To keep those Cream Cheese Chocolate Chip Cookies as irresistible as day one, proper storage is key. Here are the best practices to ensure lasting freshness and flavor:
- Airtight Is Right : Store your cookies in an airtight container to keep them soft and chewy.
- Separate Layers : Use parchment paper between layers to prevent them from sticking together.
- Room Temperature Rules : Keep them at room temperature for up-to 1 week; avoid storing them in the refrigerator as it can dry them out.
- Keep It Secret, Keep It Safe : If you’re storing cookies with different flavors, keep them separate to avoid mingling of the tastes.
Following these guidelines promises that each cookie you reach for will be as delectable as the first.
The Freezing Debate: Dough or Baked Cookies?
The debate around whether to freeze dough or baked cookies is a hot topic among bakers-and for good reason! Here’s the scoop on both options.
Freezing Dough:
- Pros: Bake fresh cookies on demand.
- The freezing process can enhance flavor complexity.
- Cons: Requires planning and thawing time before baking.
- Takes up more freezer space than baked cookies.
Freezing Baked Cookies:
- Pros: Instant gratification-thaw and enjoy.
- Ideal for unexpected guests or sudden cravings.
- Cons: May lose some texture compared to freshly baked.
- Can become dry if not wrapped and frozen properly.
Both methods have their merits. It often boils down to personal preference: the aroma of fresh cookies in the oven versus the convenience of quicker treats.
Let’s Talk Pairings and Occasions
What to Serve Alongside Your Cookie Creations
Pairing your Cream Cheese Chocolate Chip Cookies with the perfect side or beverage can truly enhance your dessert experience. Here’s what can complement your cookie creations wonderfully:
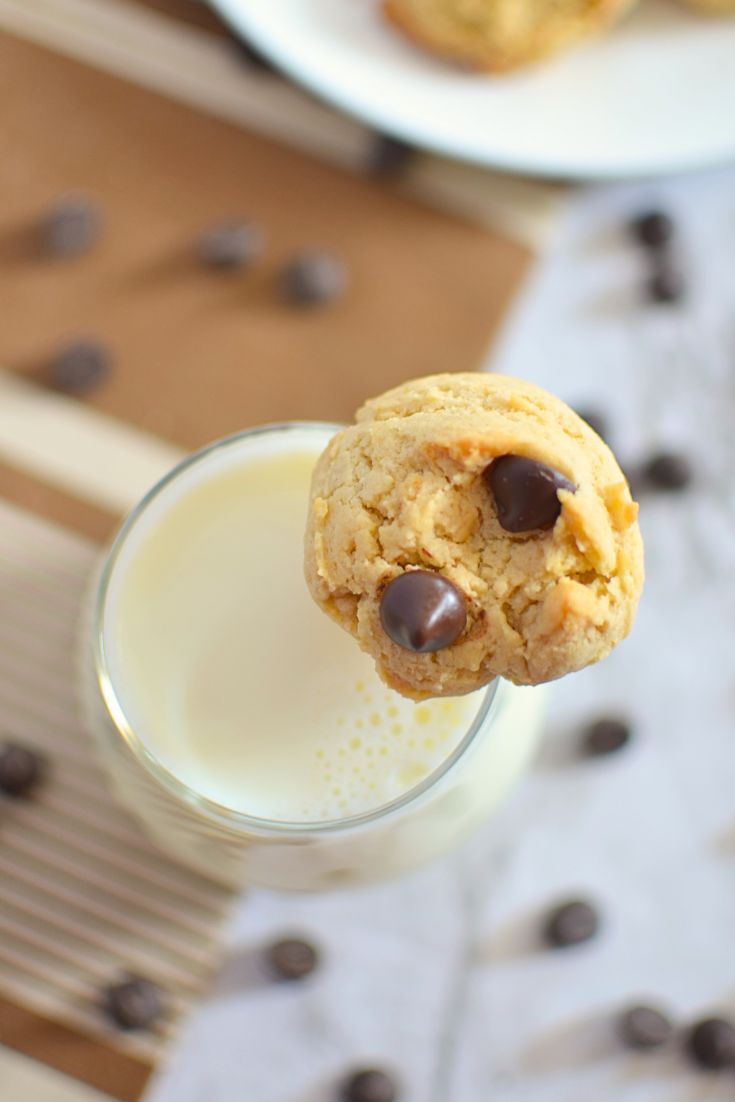
- A cold glass of milk for the classic cookie indulgence.
- Gourmet coffee or a latte, allowing the flavors to play off the cookies’ richness.
- For a special occasion, try a dessert wine that appreciates the sweetness.
- Vanilla or chocolate ice cream for a cookies and cream delight-bake some cookies a bit longer to make a crunchy topping!
- Or, keep it simple with a dollop of whipped cream and a sprinkle of cinnamon for a cozy treat.
Whether it’s a solo snack or a grand dessert spread, these pairings are sure to elevate your cream cheese chocolate chip experience.
Celebrating with Cream Cheese Chocolate Chip Delights
Cream Cheese Chocolate Chip Cookies aren’t just a treat; they’re a celebration in every bite! Whether you’re marking a milestone or just want to infuse some joy into an ordinary day, these cookies are perfect for any occasion. Here’s how to celebrate with these delectable delights:
- Birthday Bashes : Skip the cake and offer a cookie platter or a cookie cake instead.
- Holiday Gatherings : Add a festive twist with themed sprinkles or shapes.
- Office Parties : Make the workday a bit sweeter by sharing a batch with colleagues.
- Potlucks and Picnics : Easy to transport and a surefire crowd-pleaser.
- Gift Giving : Package them beautifully and spread the love.
Next time you’re looking for a sweet way to make a moment special, let these cookies be part of your joyful memories.
Can I Use Low-Fat Cream Cheese for These Cookies?
No, it’s best to stick to full-fat cream cheese for that rich taste and ideal texture. Low-fat versions can lead to runnier dough and less flavorful cookies.
[Insert a comparison chart or infographic highlighting the difference in cookie quality between full-fat and low-fat cream cheese usage.]
Helpful Hints for Doubling the Recipe Without Fail
Ensure all ingredients are doubled precisely; don’t eyeball it. Mix dry ingredients in a separate bowl for uniform distribution before combining them with the wet ingredients.
Can I Add Mix-Ins to the Cookie Dough?
Absolutely, feel free to add up to 2 ¼ cups of your favorite mix-ins like nuts or chocolate candies to the dough for a personalized touch.
Why add cream cheese to chocolate chip cookies?
Cream cheese adds softness, subtle tang, and rich depth to cookies, making them less sweet and more flavorful than the traditional version.
Try our Other favorite Cookie Recipes
If you loved making this Cheese Cream Chocolate Chip cookies, you should try out our other favorite cookies!
- 4 Ingredient Thumbprint cookie
- Marzipan cookies
- Mazapan
- Nutella Cookies
- Peanut butter Oatmeal cookies
- Vegan Cranberry Cookies
Ingredients
- 10 tablespoons - Melted and Cooled Unsalted butter.
- 6 oz- Softened Cream cheese
- ½ cup - Granulated sugar
- 1 cup - light brown sugar
- 2 teaspoon -Vanilla extract
- 2 cups- All-purpose flour
- ½ teaspoon - baking soda
- ½ teaspoon -Salt
- 1-½ cup - Chocolate chips
Instructions
- Preheat your oven to 350°F (175°C) and line a baking sheet with parchment paper.
- In a large mixing bowl, cream together the softened butter and cream cheese until smooth and fluffy.
- Add both granulated and brown sugars to the mix, beating until well incorporated.
- Add the vanilla extract, ensuring everything is well combined.
- In a separate bowl, whisk together the flour, baking soda, and salt.
- Gradually add the dry ingredients to the wet mixture, stirring just enough to blend without overmixing.
- Fold in the chocolate chips, distributing them evenly throughout the dough.
- Scoop the dough onto your prepared baking sheet using a cookie scoop or tablespoons, leaving space for them to spread.
- Bake in the preheated oven for about 13-15 minutes or until the edges are golden and the centers are set.
- Let the cookies rest on the baking sheet for 10-15 minutes before transferring them to a wire rack to cool completely.
Video
Nutrition
About Soniya
Hello, I am Soniya, the cofounder of The Belly Rules The Mind. Originally from Mumbai, India, I am settled in Virginia US with my husband.

I am a mother of 2 energetic boys, referred to as R2 (15-year-old) and R3 (10-year-old) on the blog. In case you are wondering who is R1, well that is my husband.
My hubby and I were born in Mumbai, India, where we were spoiled by the wealth of food choices available to us. We could enjoy everything from yummy street food to multi-cuisine restaurants and we became very picky about what we like and what we don’t. Come join us on our journey to have “The Belly Rule The Mind”
Ingredients
- 10 tablespoons - Melted and Cooled Unsalted butter.
- 6 oz- Softened Cream cheese
- ½ cup - Granulated sugar
- 1 cup - light brown sugar
- 2 teaspoon -Vanilla extract
- 2 cups- All-purpose flour
- ½ teaspoon - baking soda
- ½ teaspoon -Salt
- 1-½ cup - Chocolate chips
Instructions
- Preheat your oven to 350°F (175°C) and line a baking sheet with parchment paper.
- In a large mixing bowl, cream together the softened butter and cream cheese until smooth and fluffy.
- Add both granulated and brown sugars to the mix, beating until well incorporated.
- Add the vanilla extract, ensuring everything is well combined.
- In a separate bowl, whisk together the flour, baking soda, and salt.
- Gradually add the dry ingredients to the wet mixture, stirring just enough to blend without overmixing.
- Fold in the chocolate chips, distributing them evenly throughout the dough.
- Scoop the dough onto your prepared baking sheet using a cookie scoop or tablespoons, leaving space for them to spread.
- Bake in the preheated oven for about 13-15 minutes or until the edges are golden and the centers are set.
- Let the cookies rest on the baking sheet for 10-15 minutes before transferring them to a wire rack to cool completely.
Video
Nutrition
Rediscovering the Classic Treat
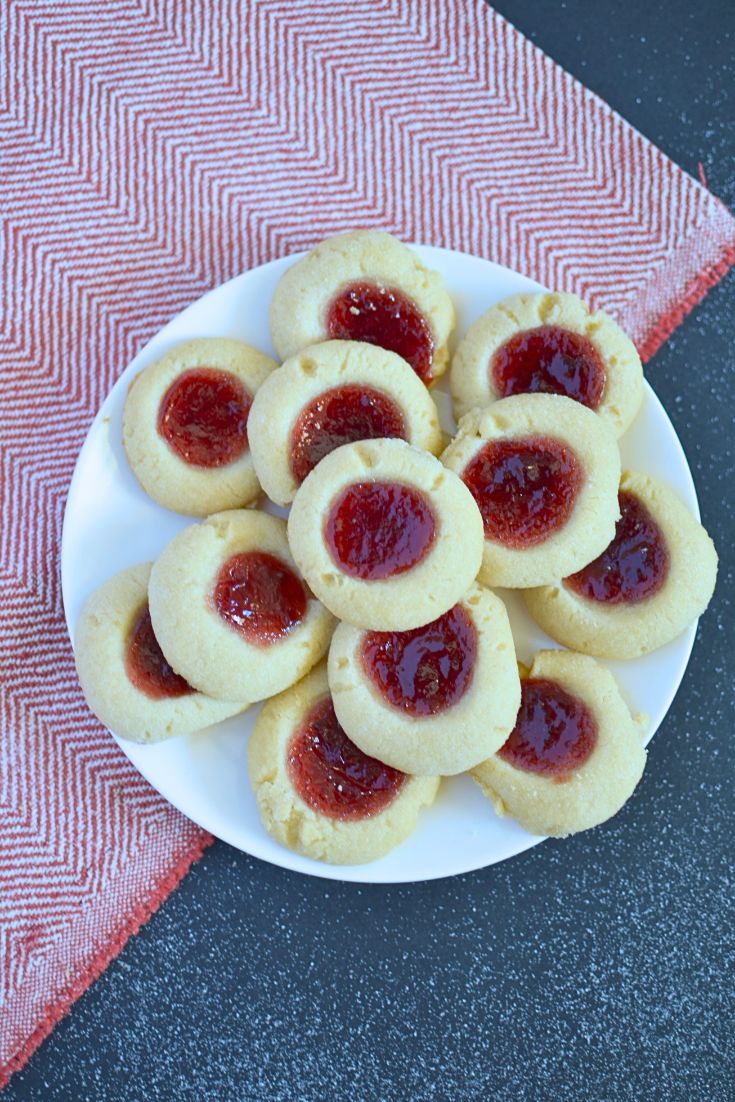
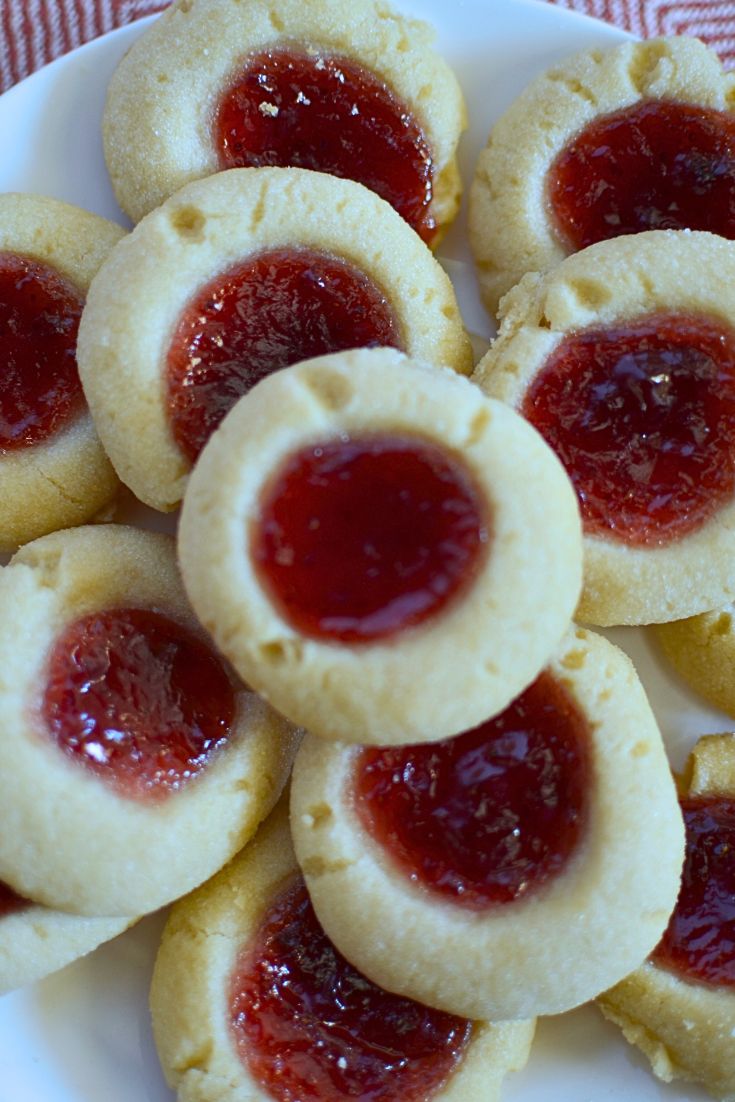
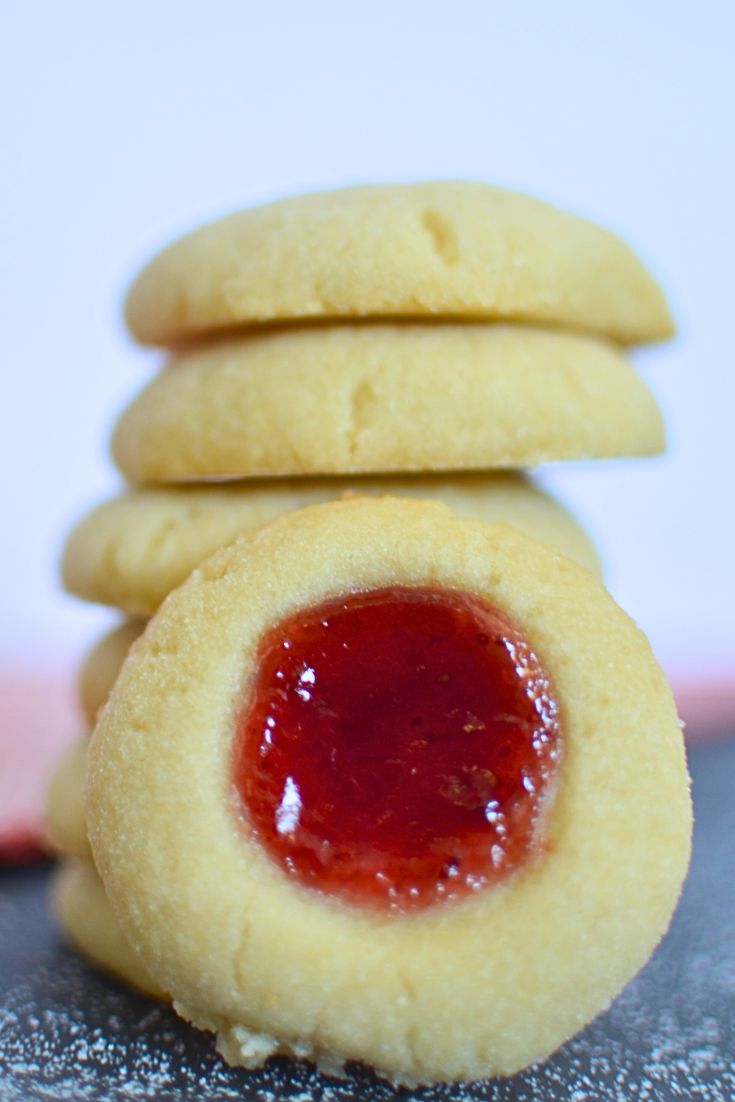
Today, we’re diving into the world of those adorable and utterly delectable Raspberry Thumbprint Cookies. Whether you’re a seasoned baker or a novice looking for an uncomplicated sweet treat to whip up, these cookies are going to steal the show. And the best part? You only need four ingredients to get started!
Come JOIN US on Instagram @thebellyrulesthemind.official and Pinterest @Bellyrulesdmind and be a part of our community and discuss various recipes, tips and tricks.

Embrace the Simple Joy of 4 Ingredients
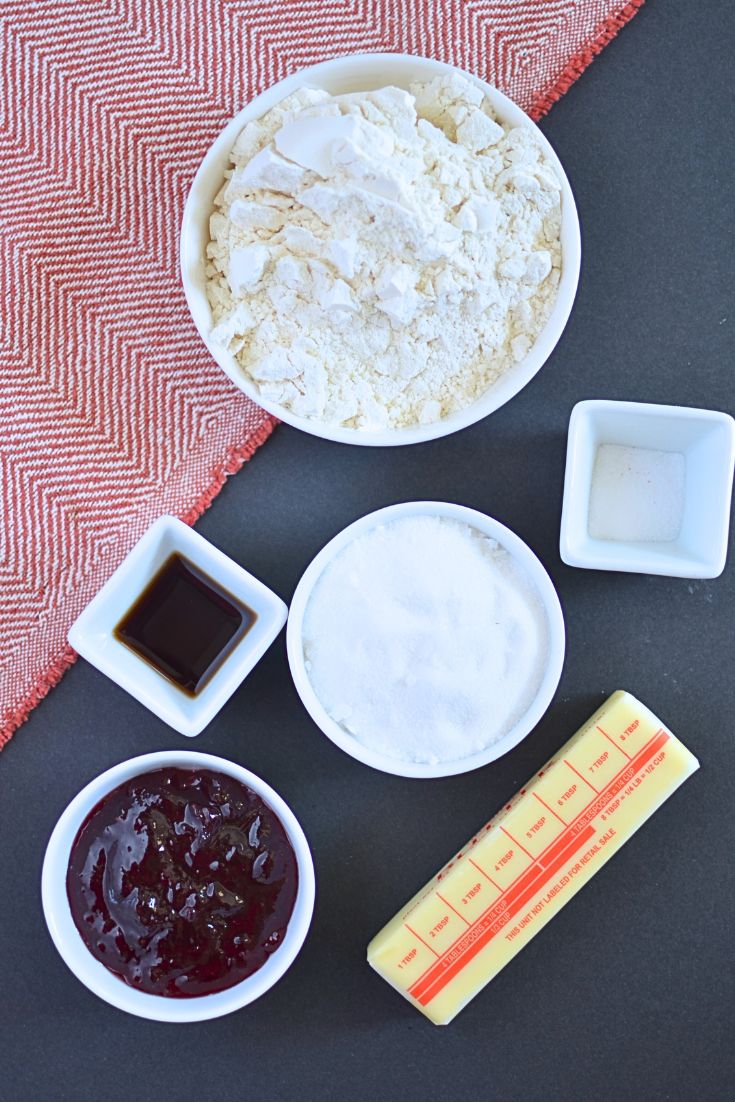
Let’s get back to basics and embrace the simple joy of 3-ingredient baking! In a world where recipes often come with a laundry list of components, there’s something truly refreshing about a dish that requires only a trio of staples. Raspberry Thumbprint Cookies are the embodiment of simplicity, yet they pack a punch of sweet, fruity flavor that’s bound to please any palate. Gather your flour, butter, sugar, and raspberry jam, and you’re ready to start this fuss-free baking adventure.
Gathering Your Ingredients
Selecting the Best Raspberry Jam
When it comes to Raspberry Thumbprint Cookies, the jam isn’t just a filling-it’s the star of the show! So, selecting the best raspberry jam is crucial for that burst of berry flavor in each bite. Look for jams with a high fruit content and minimal added sugars for a more natural and robust raspberry taste. Don’t be afraid to explore artisanal or homemade jams, which often come packed with an extra punch of fresh fruit goodness.
The Simplicity Behind the Cookie Dough
The beauty of these Raspberry Thumbprint Cookies lies in the simplicity behind the cookie dough. With just a handful of ingredients - typically all-purpose flour, unsalted butter, and perhaps a touch of almond extract for depth - this dough brings together rich, buttery goodness with a crumbly, melt-in-your-mouth texture. Whether you’re using a box of ready-made cookie dough for convenience or mixing up your own with these pantry staples, the process is straightforward and rewarding.
Step-by-Step Baking Guide to make Raspberry Thumbprint cookies
Mixing the Dough with Ease
Mixing the dough for your Raspberry Thumbprint Cookies couldn’t be easier. Begin by creaming together room-temperature butter to ensure it’s light and fluffy - this helps create a delicate cookie texture. Then, gradually blend in your flour, creating a pliable and smooth dough. If it feels dry or crumbly, as can happen, just add a tiny bit of butter to bring it together. Rest assured, a soft and cohesive dough is within reach with just a little patience and some elbow grease!
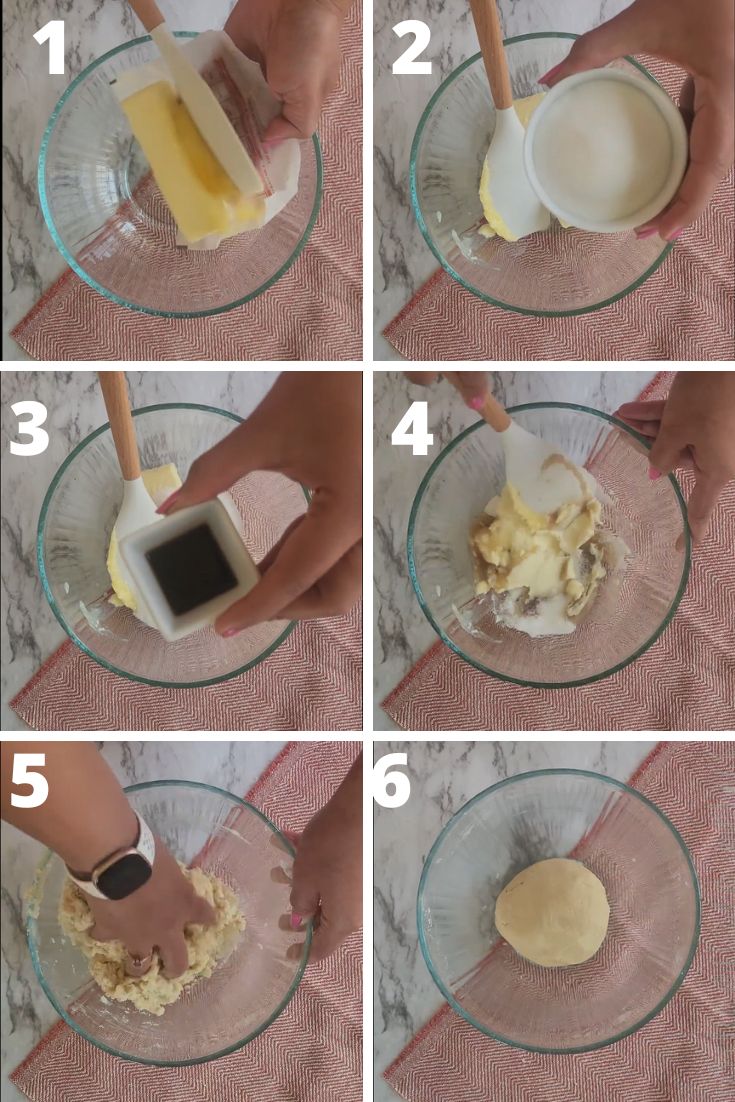
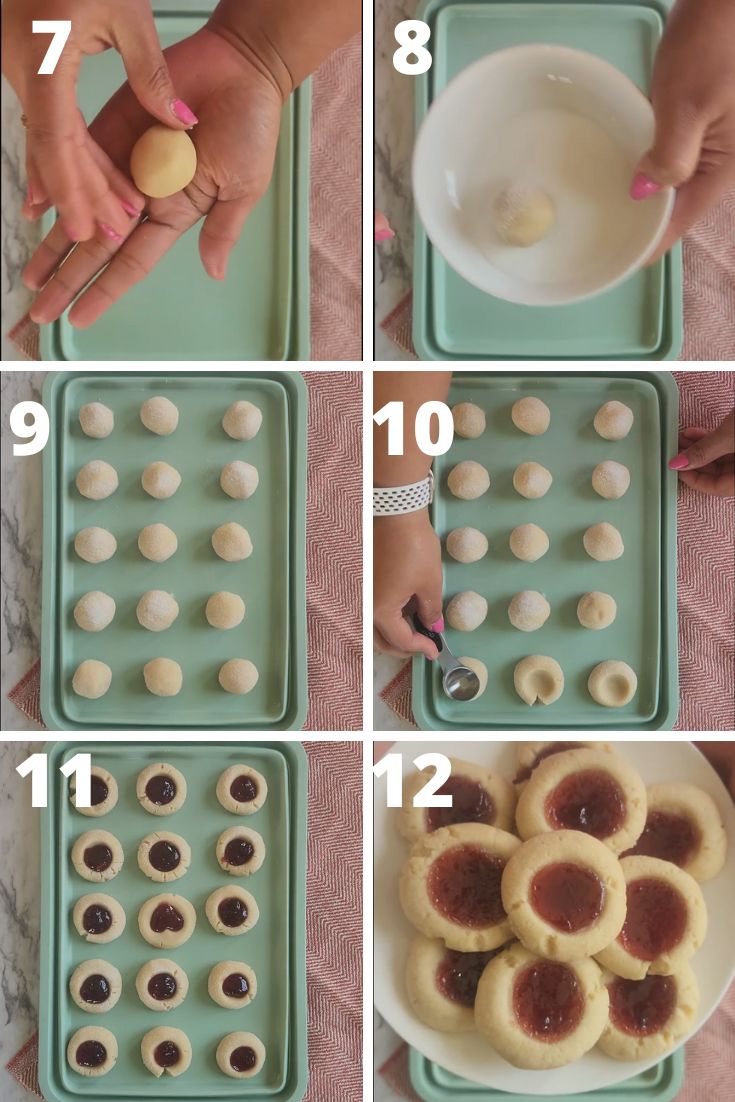
Shaping, Jamming, and Baking to Perfection
Once the dough is ready, shaping your cookies is a delightful and hands-on step. Scoop even portions and roll them between your palms until they’re nice and round. Roll the balls in the additional sugar and then set them on the baking sheet to ensure they don’t touch each other. Now here’s the fun part: use your thumb to create a generous well in the center of each cookie, making a perfect nest for that luscious jam. After spooning the raspberry jam into the indents, bake your thumbprint cookies just until they’re lightly kissed with a golden hue. Remember, every oven is different, so keep an eye on them to ensure they achieve that perfect bake. Preheat oven to 350°F (180°C). Bake the cookies for around 10-13 minutes or until the edges JUST begin to brown. Let the cookies cool for around 5-10 minutes.
Customizing Your Thumbprints
Variations for Every Occasion
The versatility of Raspberry Thumbprint Cookies lends itself to endless variations suitable for every occasion. Try swapping raspberry jam for apricot, strawberry, or even a dollop of lemon curd for a zesty twist. For festive holidays, tint your cookie dough with food coloring, or add sprinkles to the edges for some sparkle. Considering dietary needs? Substitute the flour with a gluten-free blend and use vegan butter. This way, everyone can enjoy a customized treat tailored to their preferences and celebrations.
Tips for Making Them Uniquely Yours
Personalizing your Raspberry Thumbprint Cookies is all about creativity and playing with flavors and textures. Here are some tips to make them sparkle with your unique touch:
- Drizzle melted chocolate over the baked cookies for a decadent twist. Use a plastic squeeze bottle with a narrow tip for a professional look.
- Experiment with different jams like apricot, blackberry, or blueberry to find your favorite fruity center.
- Roll the cookie balls in finely chopped nuts before making the thumbprint to add a delightful crunch.
- Spice up the dough with a pinch of cinnamon or cardamom for a warm, aromatic flavor.
- For those who adore citrus, zest a lemon or orange into the dough for an extra zing.
Remember, the key to perfecting your thumbprint cookies is to follow the directions attentively and measure the ingredients with care. You can imagine delightful variations, but precision in the baking process will make those dreams a delicious reality.
Serving and Storage Suggestions
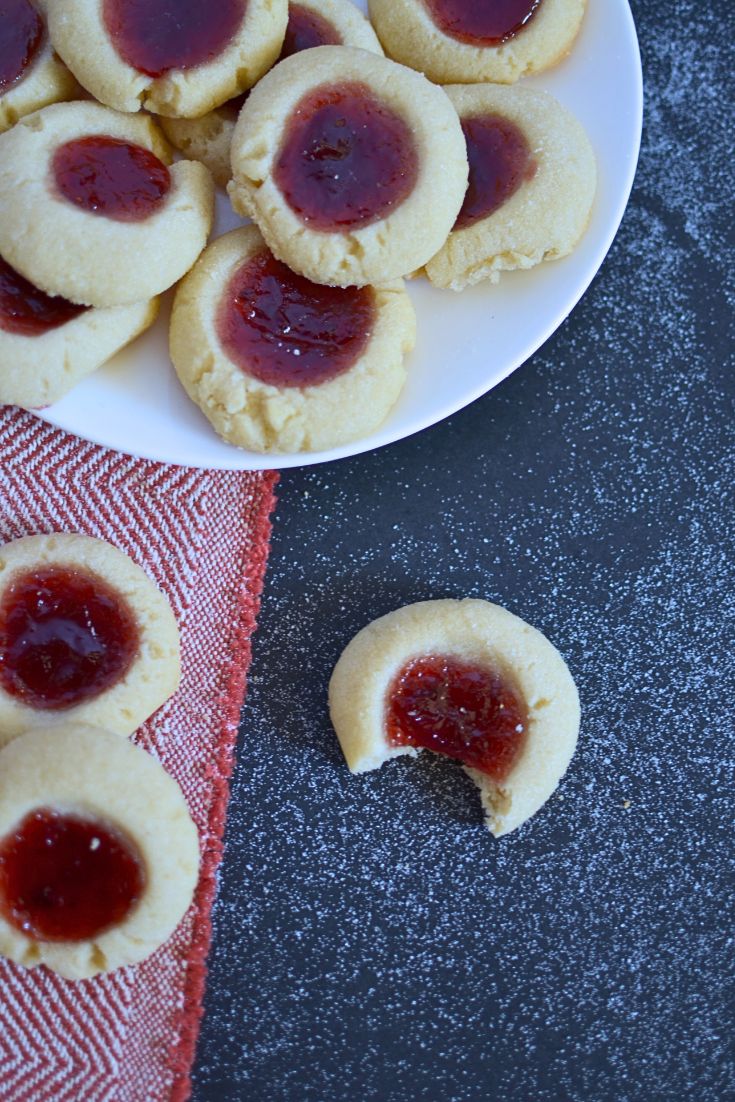
Best Ways to Serve Your Sweet Creations
Once your Raspberry Thumbprint Cookies have cooled to perfection, it’s time to serve them up in style. Present your sweet creations on a charming ceramic platter or a rustic wooden board for that picture-perfect spread. These cookies make fantastic accompaniments to afternoon tea, a gourmet book club meeting, or simply as a delightful pick-me-up with your morning coffee. Get creative and pair them with an array of teas that complement the tangy raspberry flavor, or serve alongside a glass of cold milk for a nostalgic treat.
Keeping Your Cookies Fresh and Delicious
To keep your Raspberry Thumbprint Cookies tasting as fresh and delicious as the day you baked them, storing them correctly is key. If they’re not gobbled up straight away, place them in an airtight container to lock in the moisture and prevent them from becoming stale. Cookies will typically remain fresh when stored at room temperature for about a week, but if you’re wanting to savor them slowly, the refrigerator can extend their shelf life to around 10 days. Just make sure they’re brought back to room temperature before serving, to ensure the best flavor profile and texture.
How to store cookies
Storing thumbprint cookies efficiently ensures you can savor these treats for days to come. Once completely cooled, place them in a freezer-safe container, separating layers with parchment paper to prevent sticking. Seal the container tightly to protect against freezer burn and maintain quality. For short-term storage, keep them in an airtight container at room temperature, where they will stay fresh for up to a week. Remember to label your container with the date, so you know how long your cookies have been stored. Freezing is especially handy if you plan to share at a cookie exchange or need to transport them without compromising the jam centers.
Troubleshooting Common Baking Pitfalls
What If My Cookies Spread Too Much?
If your Raspberry Thumbprint Cookies are spreading more than L.A.’s latest gossip, don’t fret-it’s a common issue that’s easily fixed. Start by chilling your dough a bit longer before baking, which helps to prevent them from flattening out too much in the oven. Adding just a smidge more flour to the dough can also provide a sturdier structure, encouraging them to hold their shape better. Another pro tip is to use cold butter instead of room temperature; this little change makes a world of difference. By tackling the spread, you’ll ensure your cookies are just as visually pleasing as they are scrumptious.
How to Achieve Perfectly Indented Centers
Achieving perfectly indented centers in your Raspberry Thumbprint Cookies is a balance of tact and technique. Before you even reach for that jam, make sure your dough balls are uniformly rolled for consistent baking. Then, create the indentations with the back of a teaspoon or a small melon baller, and here’s the secret-dust the tool with flour to prevent sticking. If the edges crack slightly, just gently press them back together. Remember, the indentations should be deep enough to cradle a generous amount of jam but not so deep that they break through the bottom. With this method, your cookies will have that hallmark thumbprint look that makes them so special.
Can I Use Frozen Raspberries Instead of Jam?
While frozen raspberries can add a fresh twist to the cookies, they don’t have the same consistency as jam and could result in a less stable filling. If you do opt to use frozen raspberries, consider cooking them down with a bit of sugar to create a homemade preserve-like texture before filling your cookies. This way, you capture the essence of ripe raspberries with the suitable thickness that thumbprint cookies require.
Why Are My Cookies Crumbly?
Your Thumbprint Cookies might turn out crumbly due to too much flour or not enough butter. Ensure you’re measuring your flour correctly-using the spoon and level method, not scooping it directly with the measuring cup. Also, your butter should be at room temperature to mix well with the flour and yield a pliable dough. Keep these tips in mind for your next batch and you’ll be on your way to a non-crumbly, perfect cookie!
How Long Will These Cookies Last In Storage?
These Cookies will last beautifully for up to a week at room temperature when stored properly in an airtight container. If you refrigerate them, they can last up to 10 days. For longer storage, freeze them for up to 3 months, placing wax paper between layers to prevent sticking. Thaw at room temperature before enjoying, and you’ll have that just-baked taste anytime!
Othe Cookie Recipes
If you loved making the Raspberry Thumbprint cookie, you should try out our favorite cookies
- Marzipan cookies
- Mazapan
- Nutella Cookies
- Peanut butter Oatmeal cookies
- Vegan Cranberry Cookies

Ingredients
- 1 cup / stick Softened unsalted Butter.
- ¾ cup Sugar
- 2 cups All-purpose flour
- ½ cup of your favorite jam or jelly Raspberry Jam
- 1 teaspoon vanilla extract
- Pinch of Salt
Instructions
- Mixing the Dough with EaseBegin by creaming together room-temperature butter to ensure it’s light and fluffy - this helps create a delicate cookie texture.
- Then, gradually blend in your flour, creating a pliable and smooth dough.
- If it feels dry or crumbly, as can happen, just add a tiny bit of butter to bring it together. Rest assured, a soft and cohesive dough is within reach with just a little patience and some elbow grease!
- Shaping, Jamming, and Baking to PerfectionOnce the dough is ready, shaping your cookies is a delightful and hands-on step.
- Scoop even portions and roll them between your palms until they’re nice and round.
- Roll the balls in the additional sugar and then set them on the baking sheet to ensure they don’t touch each other.
- Now here’s the fun part: use your thumb or scoop to create a generous well in the center of each cookie, making a perfect nest for that luscious jam.
- Spooning the raspberry jam into the indents
- Bake your thumbprint cookies just until they’re lightly kissed with a golden hue.
- Remember, every oven is different, so keep an eye on them to ensure they achieve that perfect bake.
- Preheat oven to 350°F (180°C).
- Bake the cookies for around 10-13 minutes or until the edges JUST begin to brown.
- Let the cookies cool for around 5-10 minutes.
Video
Nutrition
About Soniya
Hello, I am Soniya, the cofounder of The Belly Rules The Mind. Originally from Mumbai, India, I am settled in Virginia US with my husband.
I am a mother of 2 energetic boys, referred to as R2 (15-year-old) and R3 (10-year-old) on the blog. In case you are wondering who is R1, well that is my husband.
My hubby and I were born in Mumbai, India, where we were spoiled by the wealth of food choices available to us. We could enjoy everything from yummy street food to multi-cuisine restaurants and we became very picky about what we like and what we don’t. Come join us on our journey to have “The Belly Rule The Mind”
