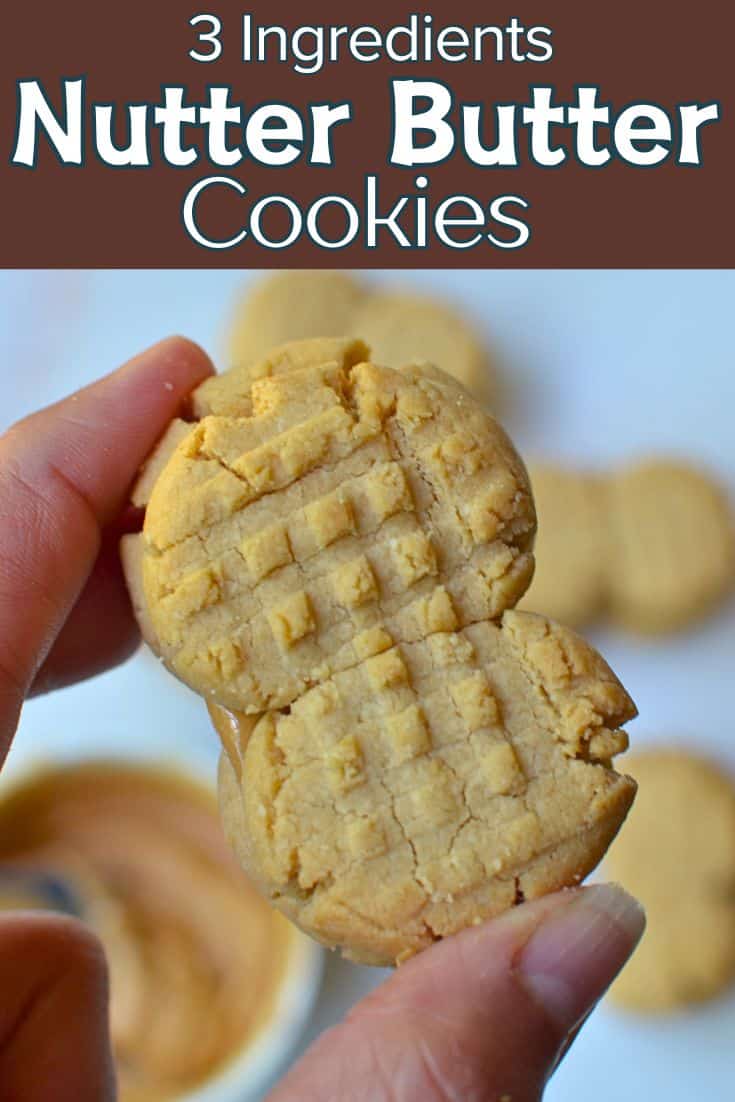
Introduction
Who doesn’t love a delicious cookie with a cold glass of milk? If you’re shaking your head in agreement, then you’re in for a treat with Nutter Butter Cookies. They aren’t just another snack; they’re a piece of nostalgic joy and comfort for both kids and adults alike. This article provides an in-depth look at why these peanut-shaped cookies deserve a spot in your pantry, how you can enjoy them in various ways, and even some fun facts you might not know about them. Ready to discover your new favorite treat? Let’s dive in!
The History of Nutter Butter Cookies
A Sweet Beginning
Introduced in 1969 by Nabisco, Nutter Butter Cookies quickly climbed to fame. The unique design, shaped like a peanut and filled with delicious peanut butter cream, made them an instant hit. Initially, they were designed to stand out among other cookies in the market, and they certainly achieved that goal.
Nostalgia and Popularity
The cookies have amassed a nostalgic value over the years, becoming a beloved snack across generations. Remember those commercials from the 90s? Yep, they played a massive role in building the brand and embedding these cookies into our memories.
What Makes Nutter Butter Unique?
The Perfect Peanut Butter Combo
Nutter Butter Cookies consist of two main components: the peanut-shaped cookies and the creamy peanut butter filling. The combination is a match made in heaven for peanut butter lovers. But what sets them apart?
- Texture: The cookies offer a satisfying crunch that perfectly complements the smooth, creamy filling.
- Flavor Balance: The balance of sweet and salty makes them highly addictive.
- Design: The iconic peanut shape is not just for show; it adds a unique bite feel compared to regular round cookies.
Step-by-Step Nutter Butter Cookies Recipe
Preparing the Dough
- Preheat the Oven : Start by preheating your oven to 350°F (175°C).
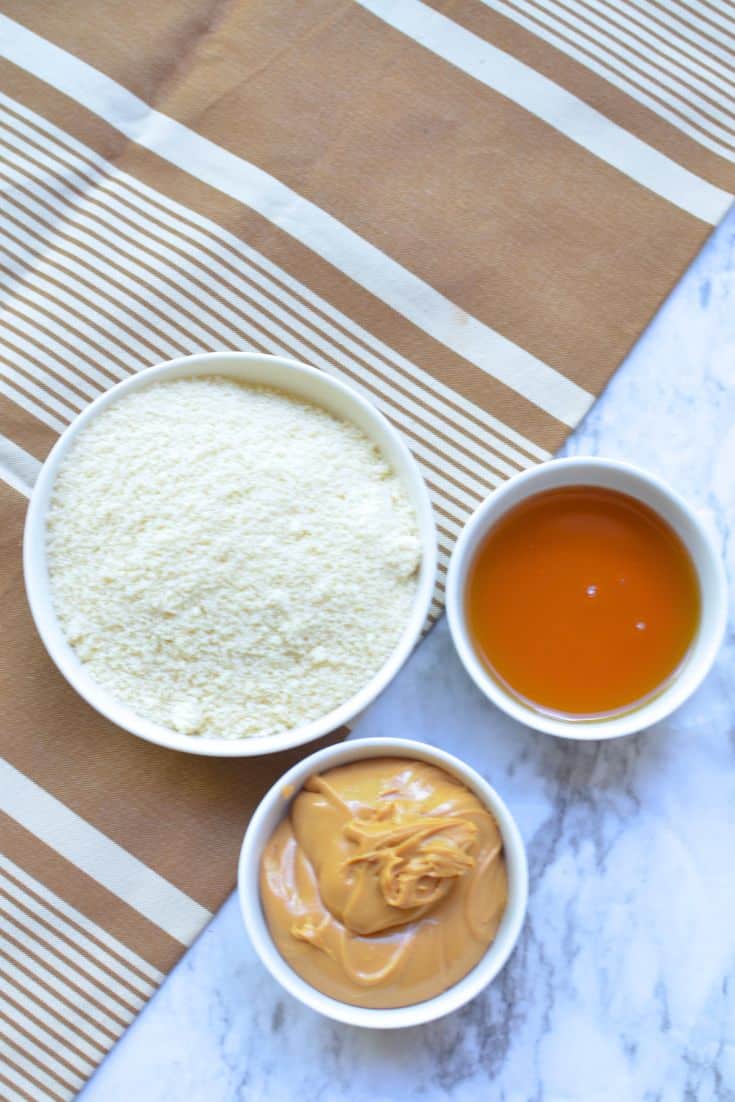
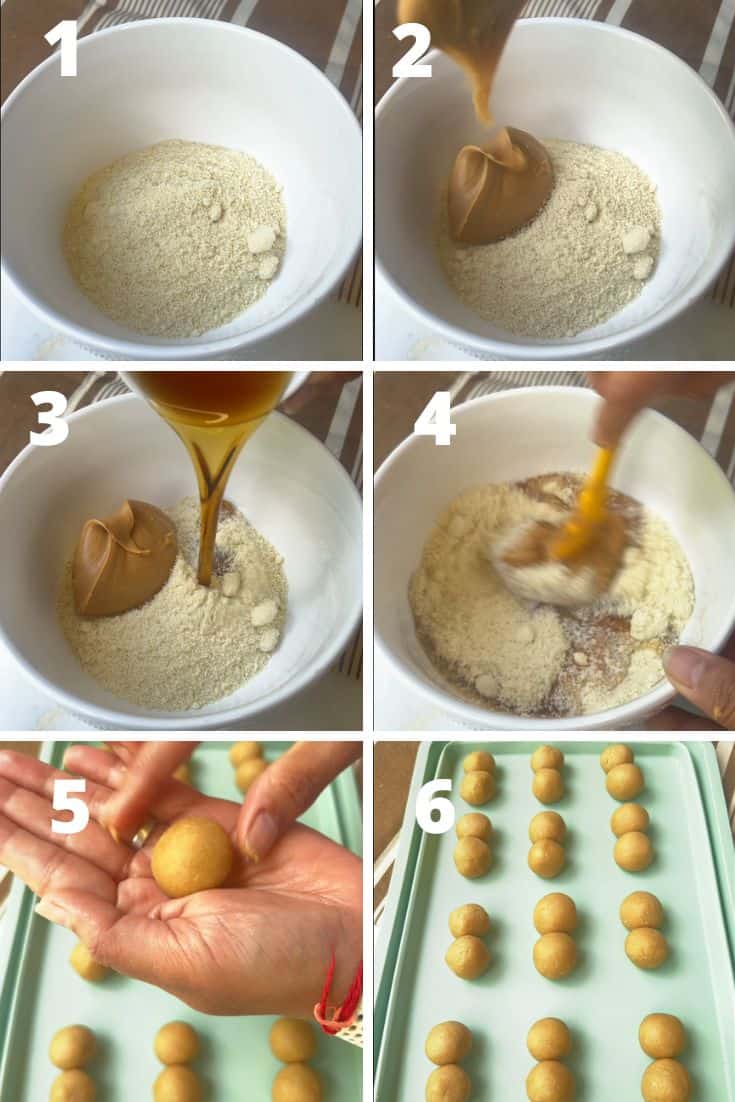
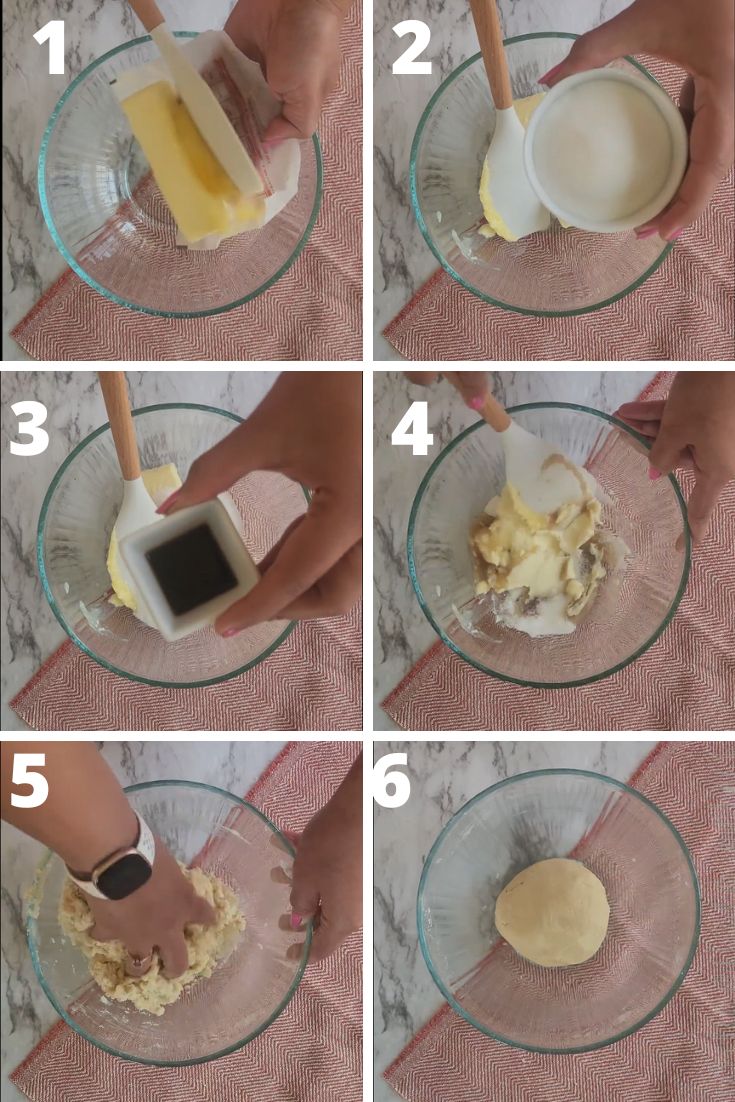
- Combine Ingredients : In a bowl, whisk together the almond flour, peanut butter and maple syrup. Keep mixing until the dough forms.
Shaping the Cookies and assembling
- Shape the Dough : Using your hands, shape small amounts of dough into ovals to mimic peanut shapes.
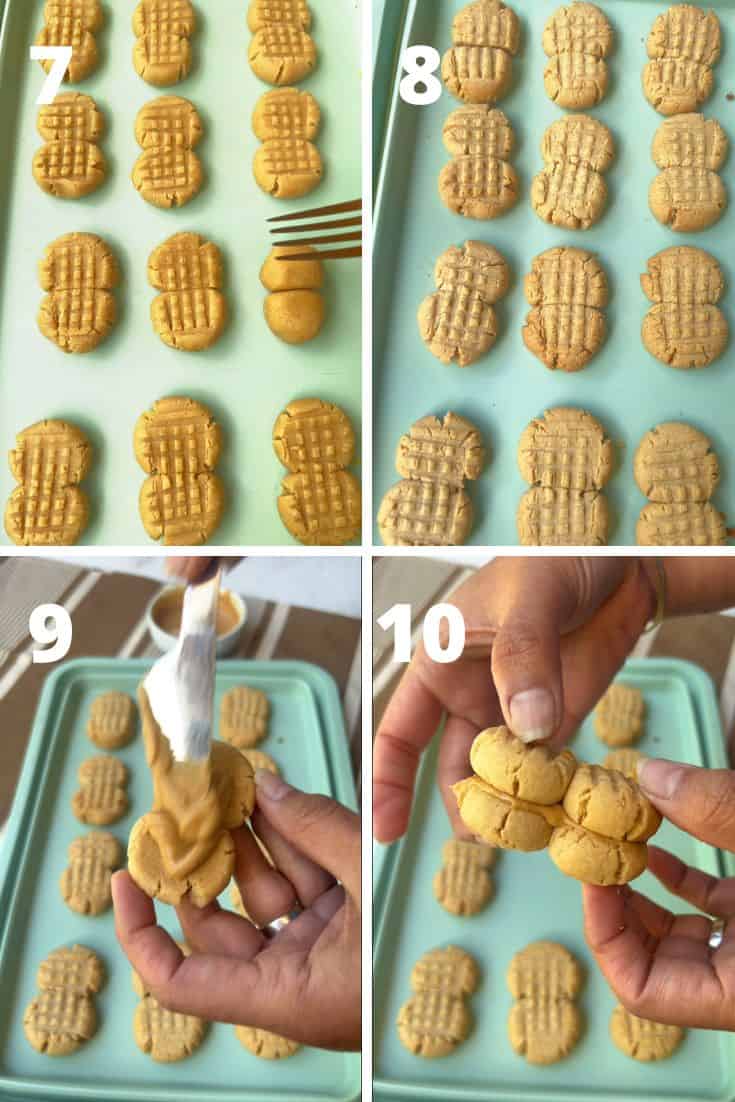
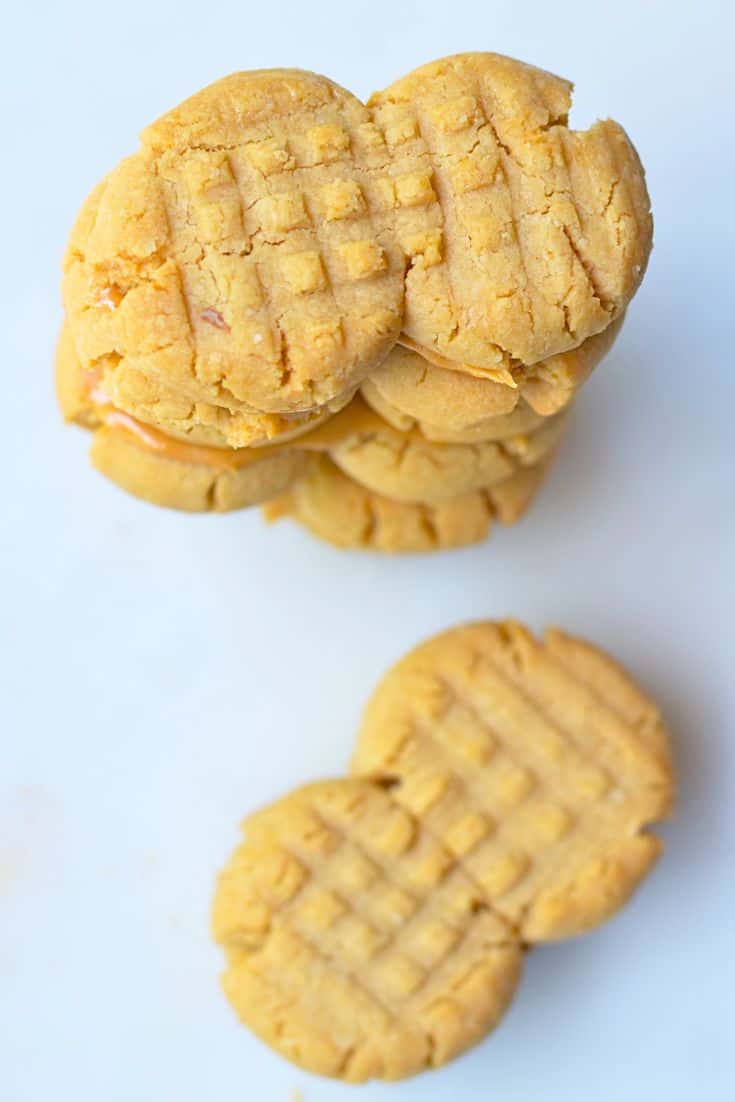
- Create the Texture : Use a fork to create the signature crisscross pattern on each cookie.
- Bake : Place the cookies on a baking sheet lined with parchment paper and bake for 10-12 minutes or until golden brown. Allow them to cool on the pan for a few minutes before transferring to a wire rack to cool completely.
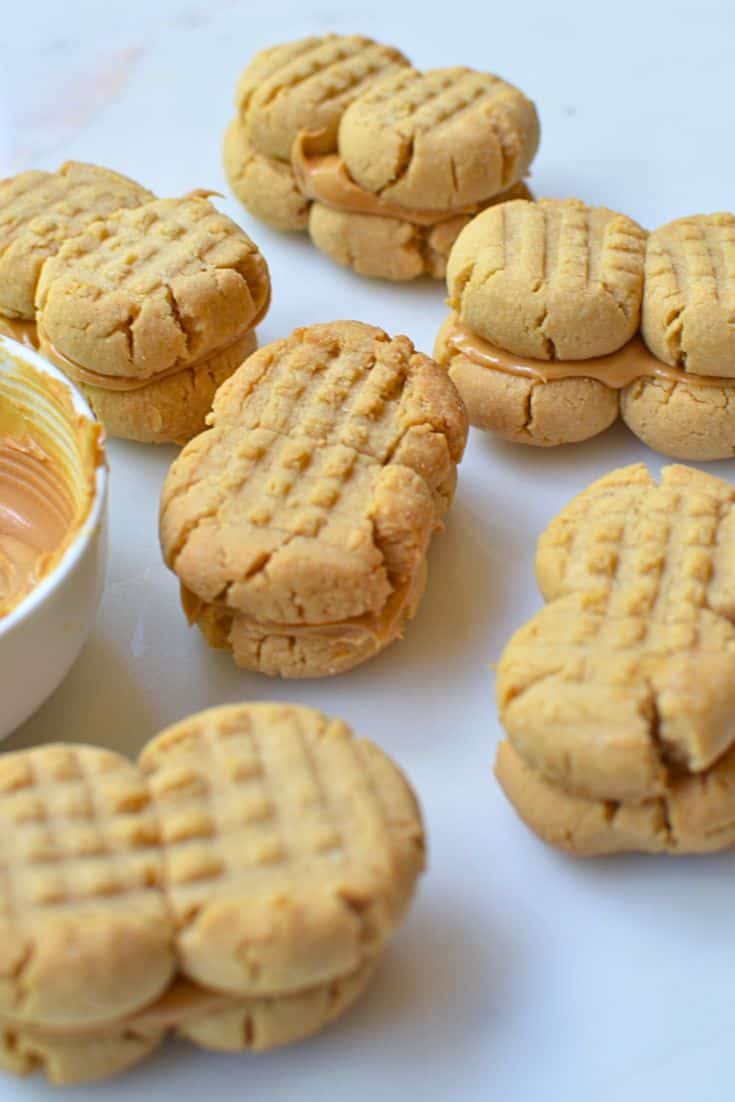
- Once the cookies are cool, spread a generous amount of peanut butter filling on the flat side of one cookie and sandwich with another. Repeat until all cookies are paired.
Different Types and Variations
Over the years, various versions of Nutter Butter have popped up to keep things interesting:
- Nutter Butter Bites: These bite-sized cookies are perfect for on-the-go snacking. You can change the size of the cookies to create these at home
- Double Nutty: For those who can’t get enough peanut butter, this version doubles the filling.
- Nutter Butter Creme Patties: You can create your own twist featuring a chocolate-covered version filled with that same beloved peanut butter cream.
- Seasonal Variations: You can also make holiday-themed Nutter Butter Cookies, like heart-shaped cookies for Valentine’s Day.
Fun Ways to Enjoy Nutter Butter Cookies
Dipping and Dunking
There’s more to Nutter Butter than just opening a pack and munching away:
- Dip Them in Milk: It’s a classic for a reason. The milk softens the cookie and enhances the peanut butter flavor.
- Coffee Companion: Dunking them in your morning coffee can create a blend of sweet and bitter that’s hard to resist.
Creative Crafts
Surprisingly, Nutter Butter Cookies also make fantastic bases for creative food crafts. Perfect for kids’ activities, birthday parties, or even holiday decorations, turning them into edible works of art can be as fun as eating them!
Moderation is Key
While these cookies can be a delightful indulgence, remember moderation is vital. Overeating any sweet treat can lead to the usual nutrition pitfalls, including excessive sugar and calorie intake.
Fun Facts about Nutter Butter Cookies
- Limited Editions: Nabisco occasionally releases limited edition variations, adding an element of surprise for fans.
- Vegan Option: The original recipe is surprisingly vegan. However, always check the packaging as recipes can change.
- Cultural Impact: In the US, Nutter Butter has a significant cultural footprint, frequently appearing in pop culture references and social media memes.

Tips for the Best Nutter Butter Cookies
- Use High-Quality Peanut Butter : The quality of your peanut butter can significantly impact the taste of your cookies.
- Don’t Overmix : Overmixing can result in dense cookies. Mix just until ingredients are combined.
- Chill the Dough : For better texture, chill the dough for about 30 minutes before shaping and baking.
How to Store
Keep your cookies in an airtight container at room temperature for up to a week. For longer storage, freeze the assembled cookies for up to three months.
Can I use crunchy peanut butter in my Nutter Butter Cookies recipe?
While you can use crunchy peanut butter, it will alter the texture of your cookies. Creamy peanut butter is recommended for the smoothest filling and most authentic taste.
How can I make my cookies gluten-free?
To make gluten-free Nutter Butter Cookies, substitute the all-purpose flour with a gluten-free flour blend. Ensure all other ingredients are gluten-free as well.
What if I don’t have powdered sugar for the filling?
If you don’t have powdered sugar, you can blend granulated sugar in a blender or food processor until fine.
Conclusion
Nutter Butter Cookies are more than a sweet treat; they’re a beloved snack that has stood the test of time. Whether you’re a long-time fan or a newcomer, these peanut-flavored delights offer something for everyone. From their unique taste and texture to the myriad of enjoyable ways to consume them, Nutter Butter Cookies firmly earn their place as a favorite indulgence. So, next time you’re in the cookie aisle, you know what to add to your cart.
“Life is short. Eat the Nutter Butter Cookies.”
Call to Action
I hope you found this ultimate guide helpful and engaging. Happy snacking! If you’re interested in more delicious treats, check out this guide on the best strawberry chocolate chip cookies or visit our homepage for more food adventures.
Try our Other favorite Cookie Recipes
If you loved making this Cheese Cream Chocolate Chip cookies, you should try out our other favorite cookies!
- 4 Ingredient Thumbprint cookie
- Marzipan cookies
- Mazapan
- Nutella Cookies
- Peanut butter Oatmeal cookies
- Vegan Cranberry Cookies
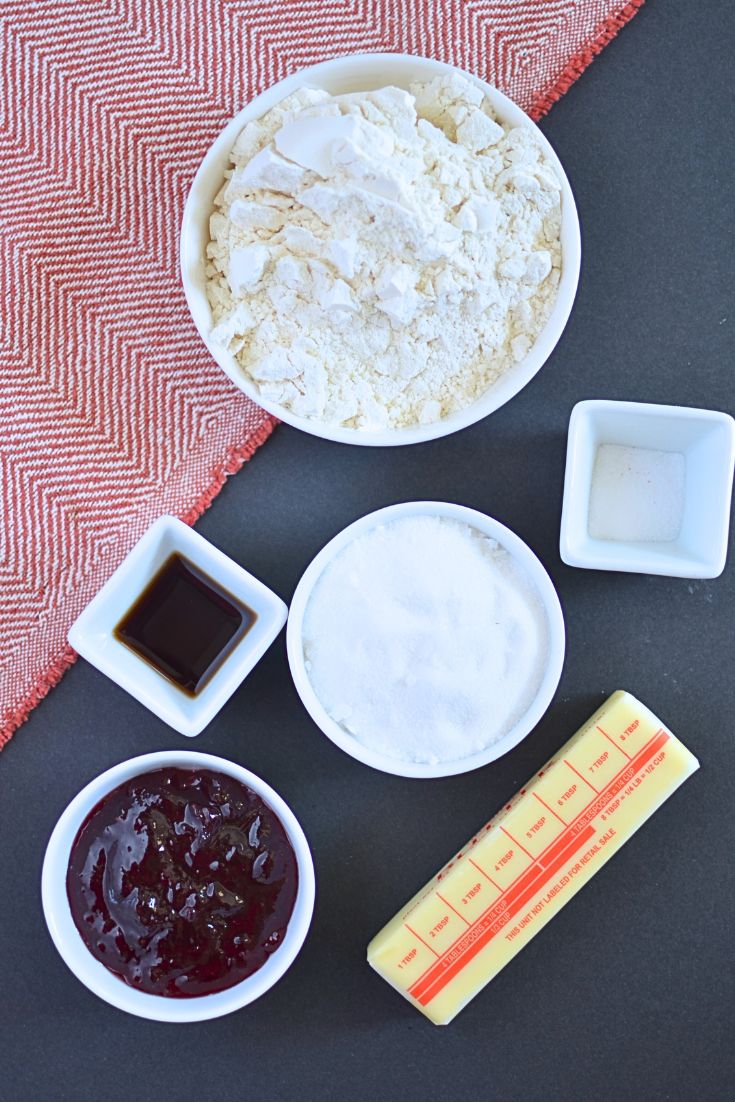
Ingredients
- 1 Cup Almond flour
- ½ cup Creamy Peanut Butter (Ingredients
- ⅓ Maple Syrup
- ¼ cup Peanut Butter filling
- 1 tablespoon honey
Instructions
- Preparing the DoughPreheat the Oven: Start by preheating your oven to 350°F (175°C).
- Combine Ingredients: In a bowl, whisk together the almond flour, peanut butter and maple syrup. Keep mixing until the dough forms.
- Shaping the Cookies and assemblingShape the Dough: Using your hands, shape small amounts of dough into ovals to mimic peanut shapes.
- Create the Texture: Use a fork to create the signature crisscross pattern on each cookie.
- Bake: Place the cookies on a baking sheet lined with parchment paper and bake for 10-12 minutes or until golden brown. Allow them to cool on the pan for a few minutes before transferring to a wire rack to cool completely.
- Once the cookies are cool, spread a generous amount of peanut butter filling on the flat side of one cookie and sandwich with another. Repeat until all cookies are paired.
Video
Nutrition
About Soniya
Hello, I am Soniya, the cofounder of The Belly Rules The Mind. Originally from Mumbai, India, I am settled in Virginia US with my husband.

I am a mother of 2 energetic boys, referred to as R2 (15-year-old) and R3 (10-year-old) on the blog. In case you are wondering who is R1, well that is my husband.
My hubby and I were born in Mumbai, India, where we were spoiled by the wealth of food choices available to us. We could enjoy everything from yummy street food to multi-cuisine restaurants and we became very picky about what we like and what we don’t. Come join us on our journey to have “The Belly Rule The Mind”
[Sources: Nabisco Official Website, Historical Food Magazines, Cultural References]
Ingredients
- 1 Cup Almond flour
- ½ cup Creamy Peanut Butter (Ingredients
- ⅓ Maple Syrup
- ¼ cup Peanut Butter filling
- 1 tablespoon honey
Instructions
- Preparing the DoughPreheat the Oven: Start by preheating your oven to 350°F (175°C).
- Combine Ingredients: In a bowl, whisk together the almond flour, peanut butter and maple syrup. Keep mixing until the dough forms.
- Shaping the Cookies and assemblingShape the Dough: Using your hands, shape small amounts of dough into ovals to mimic peanut shapes.
- Create the Texture: Use a fork to create the signature crisscross pattern on each cookie.
- Bake: Place the cookies on a baking sheet lined with parchment paper and bake for 10-12 minutes or until golden brown. Allow them to cool on the pan for a few minutes before transferring to a wire rack to cool completely.
- Once the cookies are cool, spread a generous amount of peanut butter filling on the flat side of one cookie and sandwich with another. Repeat until all cookies are paired.
Video
Nutrition
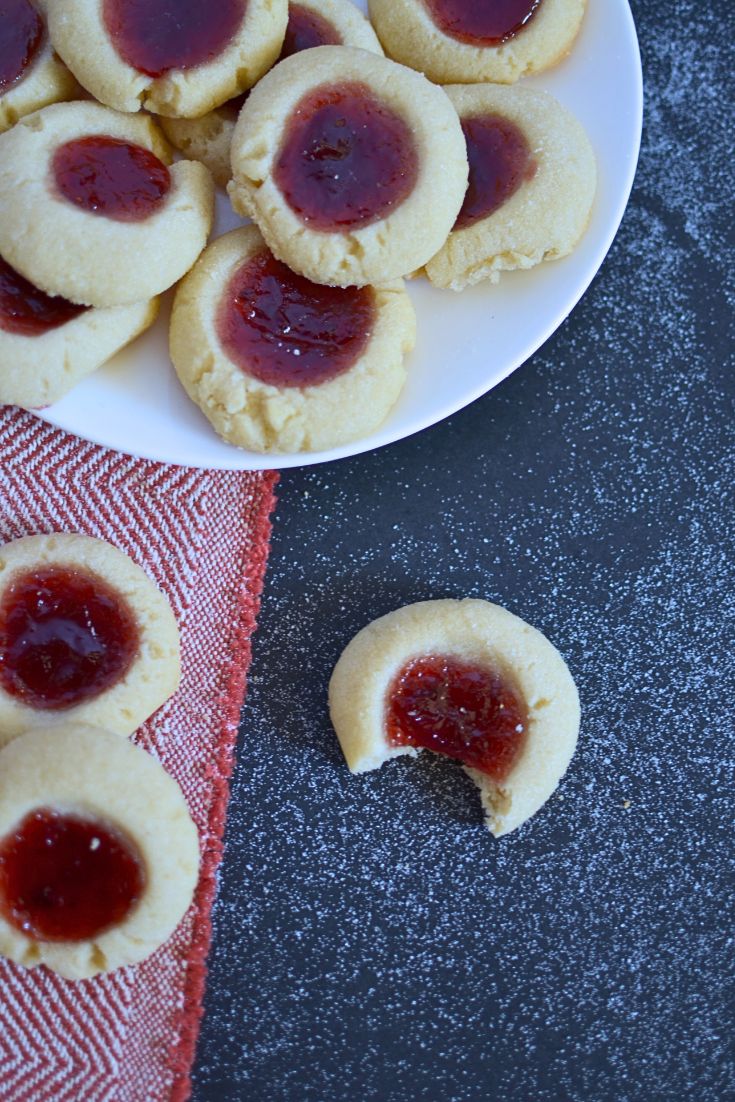
Rediscovering the Classic Treat
Today, we’re diving into the world of those adorable and utterly delectable Raspberry Thumbprint Cookies. Whether you’re a seasoned baker or a novice looking for an uncomplicated sweet treat to whip up, these cookies are going to steal the show. And the best part? You only need four ingredients to get started!
Come JOIN US on Instagram @thebellyrulesthemind.official and Pinterest @Bellyrulesdmind and be a part of our community and discuss various recipes, tips and tricks.

Embrace the Simple Joy of 4 Ingredients
Let’s get back to basics and embrace the simple joy of 3-ingredient baking! In a world where recipes often come with a laundry list of components, there’s something truly refreshing about a dish that requires only a trio of staples. Raspberry Thumbprint Cookies are the embodiment of simplicity, yet they pack a punch of sweet, fruity flavor that’s bound to please any palate. Gather your flour, butter, sugar, and raspberry jam, and you’re ready to start this fuss-free baking adventure.
Gathering Your Ingredients
Selecting the Best Raspberry Jam
When it comes to Raspberry Thumbprint Cookies, the jam isn’t just a filling-it’s the star of the show! So, selecting the best raspberry jam is crucial for that burst of berry flavor in each bite. Look for jams with a high fruit content and minimal added sugars for a more natural and robust raspberry taste. Don’t be afraid to explore artisanal or homemade jams, which often come packed with an extra punch of fresh fruit goodness.
The Simplicity Behind the Cookie Dough
The beauty of these Raspberry Thumbprint Cookies lies in the simplicity behind the cookie dough. With just a handful of ingredients - typically all-purpose flour, unsalted butter, and perhaps a touch of almond extract for depth - this dough brings together rich, buttery goodness with a crumbly, melt-in-your-mouth texture. Whether you’re using a box of ready-made cookie dough for convenience or mixing up your own with these pantry staples, the process is straightforward and rewarding.
Step-by-Step Baking Guide to make Raspberry Thumbprint cookies
Mixing the Dough with Ease
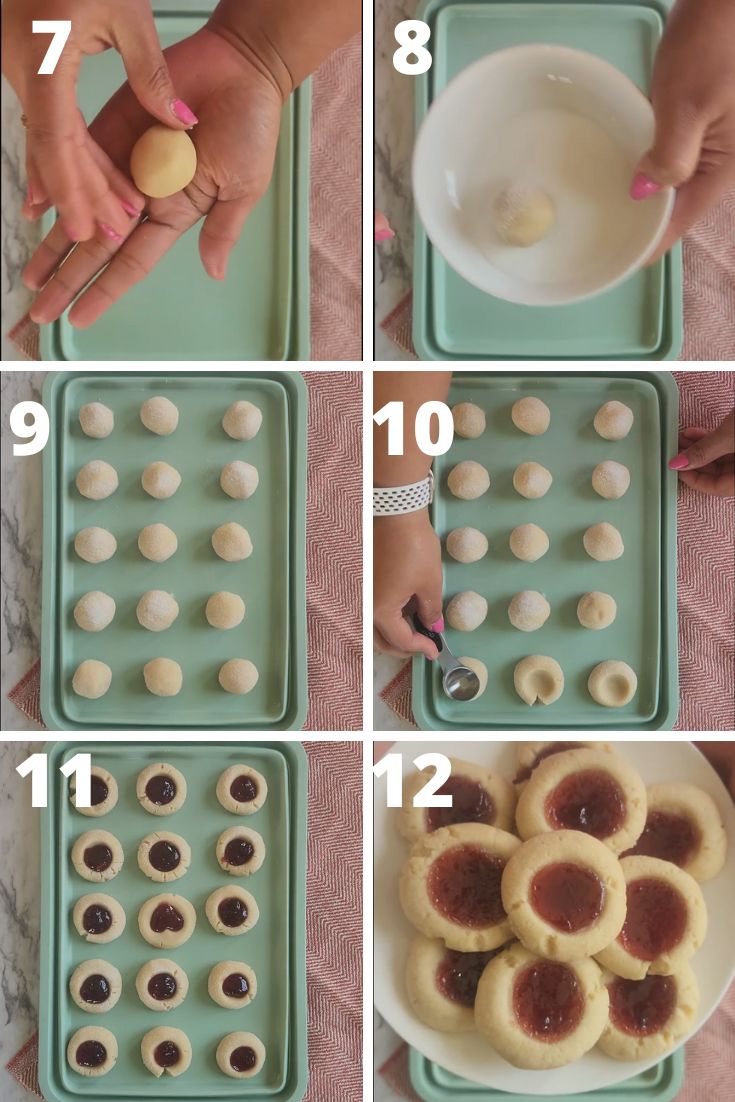
Mixing the dough for your Raspberry Thumbprint Cookies couldn’t be easier. Begin by creaming together room-temperature butter to ensure it’s light and fluffy - this helps create a delicate cookie texture. Then, gradually blend in your flour, creating a pliable and smooth dough. If it feels dry or crumbly, as can happen, just add a tiny bit of butter to bring it together. Rest assured, a soft and cohesive dough is within reach with just a little patience and some elbow grease!
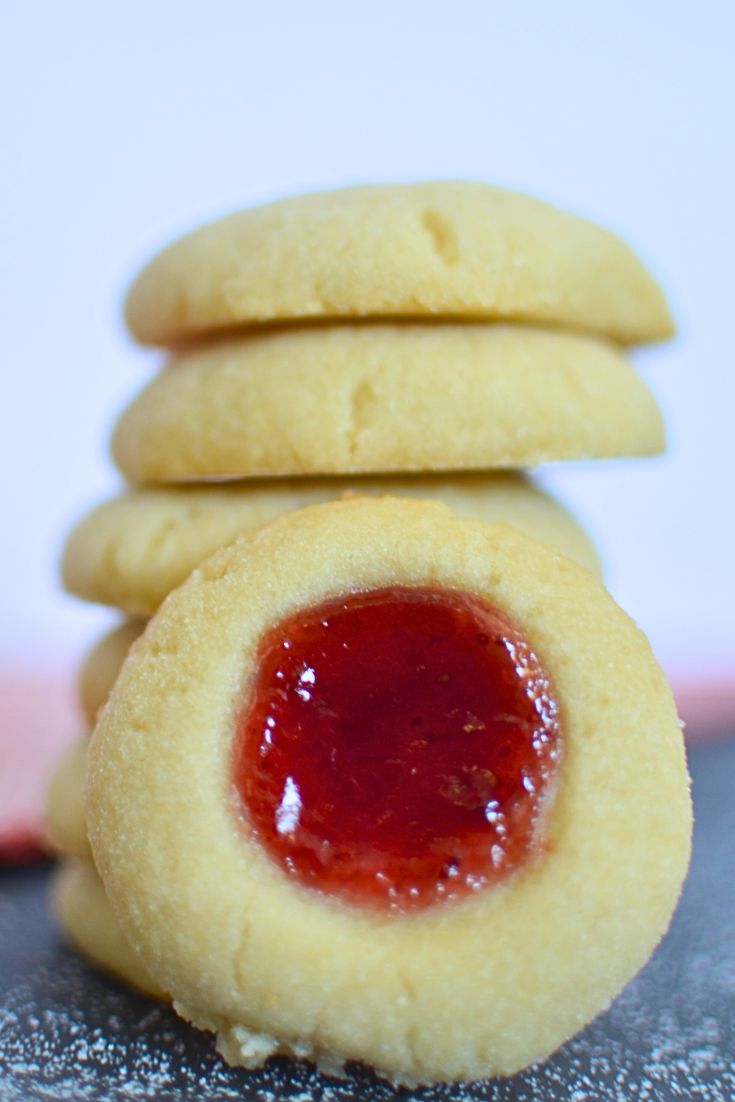
Shaping, Jamming, and Baking to Perfection
Once the dough is ready, shaping your cookies is a delightful and hands-on step. Scoop even portions and roll them between your palms until they’re nice and round. Roll the balls in the additional sugar and then set them on the baking sheet to ensure they don’t touch each other. Now here’s the fun part: use your thumb to create a generous well in the center of each cookie, making a perfect nest for that luscious jam. After spooning the raspberry jam into the indents, bake your thumbprint cookies just until they’re lightly kissed with a golden hue. Remember, every oven is different, so keep an eye on them to ensure they achieve that perfect bake. Preheat oven to 350°F (180°C). Bake the cookies for around 10-13 minutes or until the edges JUST begin to brown. Let the cookies cool for around 5-10 minutes.
Customizing Your Thumbprints
Variations for Every Occasion
The versatility of Raspberry Thumbprint Cookies lends itself to endless variations suitable for every occasion. Try swapping raspberry jam for apricot, strawberry, or even a dollop of lemon curd for a zesty twist. For festive holidays, tint your cookie dough with food coloring, or add sprinkles to the edges for some sparkle. Considering dietary needs? Substitute the flour with a gluten-free blend and use vegan butter. This way, everyone can enjoy a customized treat tailored to their preferences and celebrations.
Tips for Making Them Uniquely Yours
Personalizing your Raspberry Thumbprint Cookies is all about creativity and playing with flavors and textures. Here are some tips to make them sparkle with your unique touch:
- Drizzle melted chocolate over the baked cookies for a decadent twist. Use a plastic squeeze bottle with a narrow tip for a professional look.
- Experiment with different jams like apricot, blackberry, or blueberry to find your favorite fruity center.
- Roll the cookie balls in finely chopped nuts before making the thumbprint to add a delightful crunch.
- Spice up the dough with a pinch of cinnamon or cardamom for a warm, aromatic flavor.
- For those who adore citrus, zest a lemon or orange into the dough for an extra zing.
Remember, the key to perfecting your thumbprint cookies is to follow the directions attentively and measure the ingredients with care. You can imagine delightful variations, but precision in the baking process will make those dreams a delicious reality.
Serving and Storage Suggestions
Best Ways to Serve Your Sweet Creations
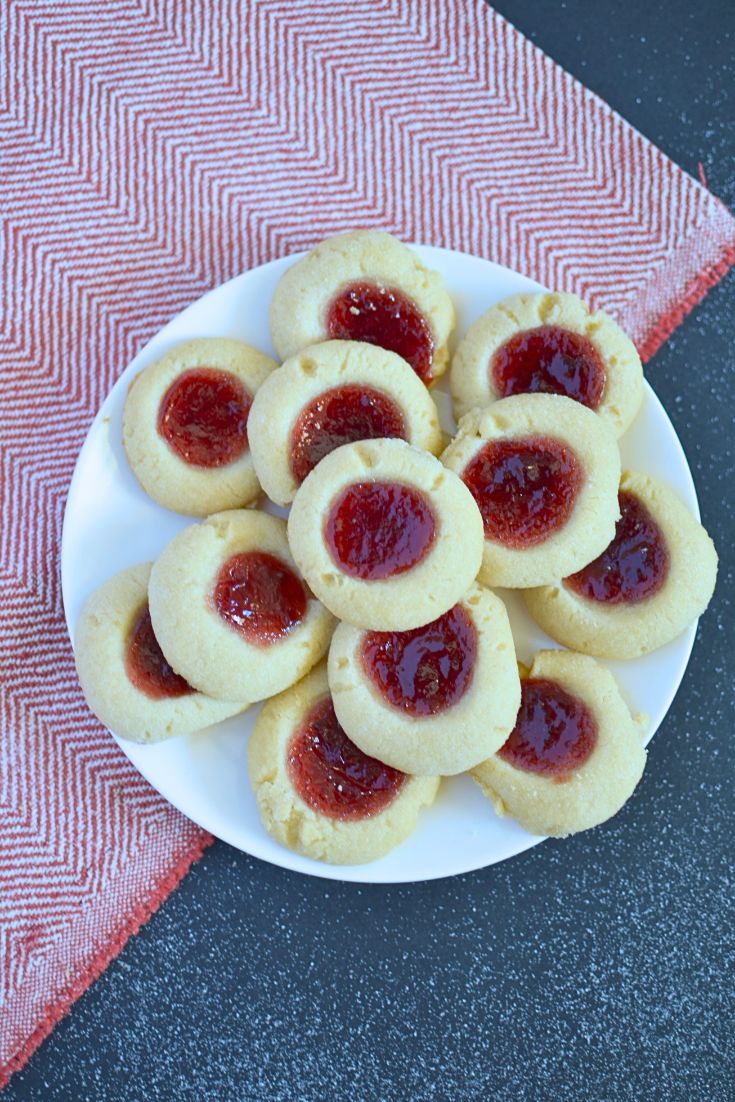
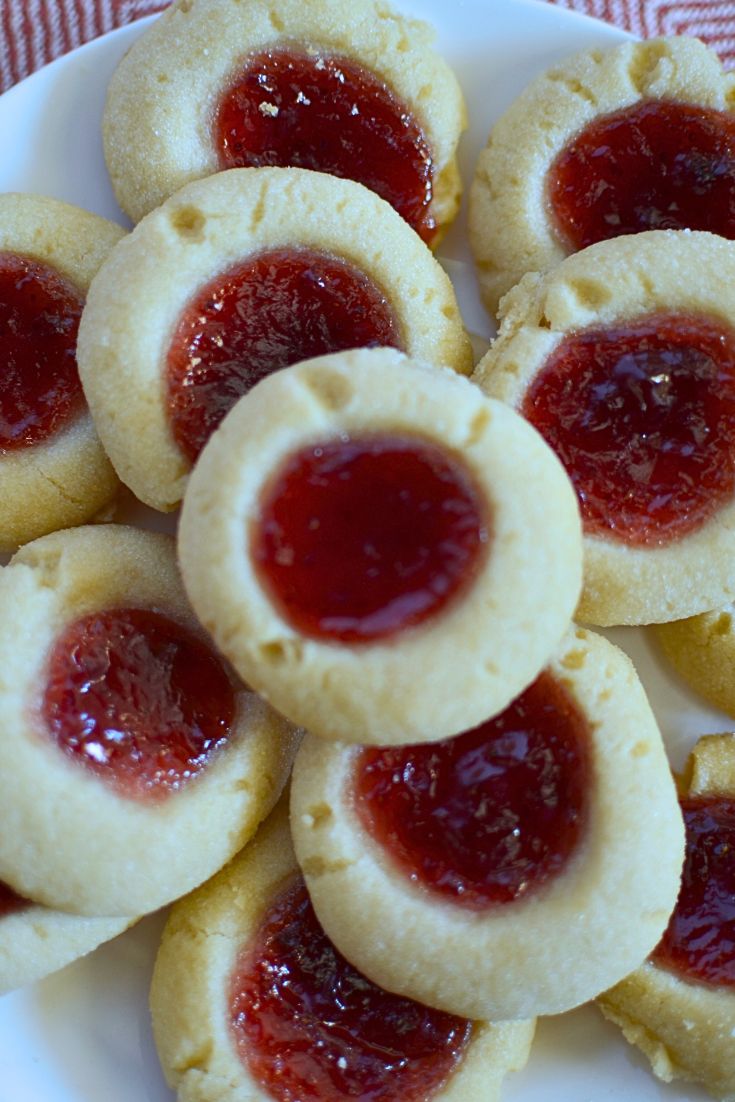
Once your Raspberry Thumbprint Cookies have cooled to perfection, it’s time to serve them up in style. Present your sweet creations on a charming ceramic platter or a rustic wooden board for that picture-perfect spread. These cookies make fantastic accompaniments to afternoon tea, a gourmet book club meeting, or simply as a delightful pick-me-up with your morning coffee. Get creative and pair them with an array of teas that complement the tangy raspberry flavor, or serve alongside a glass of cold milk for a nostalgic treat.
Keeping Your Cookies Fresh and Delicious
To keep your Raspberry Thumbprint Cookies tasting as fresh and delicious as the day you baked them, storing them correctly is key. If they’re not gobbled up straight away, place them in an airtight container to lock in the moisture and prevent them from becoming stale. Cookies will typically remain fresh when stored at room temperature for about a week, but if you’re wanting to savor them slowly, the refrigerator can extend their shelf life to around 10 days. Just make sure they’re brought back to room temperature before serving, to ensure the best flavor profile and texture.
How to store cookies
Storing thumbprint cookies efficiently ensures you can savor these treats for days to come. Once completely cooled, place them in a freezer-safe container, separating layers with parchment paper to prevent sticking. Seal the container tightly to protect against freezer burn and maintain quality. For short-term storage, keep them in an airtight container at room temperature, where they will stay fresh for up to a week. Remember to label your container with the date, so you know how long your cookies have been stored. Freezing is especially handy if you plan to share at a cookie exchange or need to transport them without compromising the jam centers.
Troubleshooting Common Baking Pitfalls
What If My Cookies Spread Too Much?
If your Raspberry Thumbprint Cookies are spreading more than L.A.’s latest gossip, don’t fret-it’s a common issue that’s easily fixed. Start by chilling your dough a bit longer before baking, which helps to prevent them from flattening out too much in the oven. Adding just a smidge more flour to the dough can also provide a sturdier structure, encouraging them to hold their shape better. Another pro tip is to use cold butter instead of room temperature; this little change makes a world of difference. By tackling the spread, you’ll ensure your cookies are just as visually pleasing as they are scrumptious.
How to Achieve Perfectly Indented Centers
Achieving perfectly indented centers in your Raspberry Thumbprint Cookies is a balance of tact and technique. Before you even reach for that jam, make sure your dough balls are uniformly rolled for consistent baking. Then, create the indentations with the back of a teaspoon or a small melon baller, and here’s the secret-dust the tool with flour to prevent sticking. If the edges crack slightly, just gently press them back together. Remember, the indentations should be deep enough to cradle a generous amount of jam but not so deep that they break through the bottom. With this method, your cookies will have that hallmark thumbprint look that makes them so special.
Can I Use Frozen Raspberries Instead of Jam?
While frozen raspberries can add a fresh twist to the cookies, they don’t have the same consistency as jam and could result in a less stable filling. If you do opt to use frozen raspberries, consider cooking them down with a bit of sugar to create a homemade preserve-like texture before filling your cookies. This way, you capture the essence of ripe raspberries with the suitable thickness that thumbprint cookies require.
Why Are My Cookies Crumbly?
Your Thumbprint Cookies might turn out crumbly due to too much flour or not enough butter. Ensure you’re measuring your flour correctly-using the spoon and level method, not scooping it directly with the measuring cup. Also, your butter should be at room temperature to mix well with the flour and yield a pliable dough. Keep these tips in mind for your next batch and you’ll be on your way to a non-crumbly, perfect cookie!
How Long Will These Cookies Last In Storage?
These Cookies will last beautifully for up to a week at room temperature when stored properly in an airtight container. If you refrigerate them, they can last up to 10 days. For longer storage, freeze them for up to 3 months, placing wax paper between layers to prevent sticking. Thaw at room temperature before enjoying, and you’ll have that just-baked taste anytime!
Othe Cookie Recipes
If you loved making the Raspberry Thumbprint cookie, you should try out our favorite cookies
- Marzipan cookies
- Mazapan
- Nutella Cookies
- Peanut butter Oatmeal cookies
- Vegan Cranberry Cookies

Ingredients
- 1 cup / stick Softened unsalted Butter.
- ¾ cup Sugar
- 2 cups All-purpose flour
- ½ cup of your favorite jam or jelly Raspberry Jam
- 1 teaspoon vanilla extract
- Pinch of Salt
Instructions
- Mixing the Dough with EaseBegin by creaming together room-temperature butter to ensure it’s light and fluffy - this helps create a delicate cookie texture.
- Then, gradually blend in your flour, creating a pliable and smooth dough.
- If it feels dry or crumbly, as can happen, just add a tiny bit of butter to bring it together. Rest assured, a soft and cohesive dough is within reach with just a little patience and some elbow grease!
- Shaping, Jamming, and Baking to PerfectionOnce the dough is ready, shaping your cookies is a delightful and hands-on step.
- Scoop even portions and roll them between your palms until they’re nice and round.
- Roll the balls in the additional sugar and then set them on the baking sheet to ensure they don’t touch each other.
- Now here’s the fun part: use your thumb or scoop to create a generous well in the center of each cookie, making a perfect nest for that luscious jam.
- Spooning the raspberry jam into the indents
- Bake your thumbprint cookies just until they’re lightly kissed with a golden hue.
- Remember, every oven is different, so keep an eye on them to ensure they achieve that perfect bake.
- Preheat oven to 350°F (180°C).
- Bake the cookies for around 10-13 minutes or until the edges JUST begin to brown.
- Let the cookies cool for around 5-10 minutes.
Video
Nutrition
About Soniya
Hello, I am Soniya, the cofounder of The Belly Rules The Mind. Originally from Mumbai, India, I am settled in Virginia US with my husband.
I am a mother of 2 energetic boys, referred to as R2 (15-year-old) and R3 (10-year-old) on the blog. In case you are wondering who is R1, well that is my husband.
My hubby and I were born in Mumbai, India, where we were spoiled by the wealth of food choices available to us. We could enjoy everything from yummy street food to multi-cuisine restaurants and we became very picky about what we like and what we don’t. Come join us on our journey to have “The Belly Rule The Mind”
